
Main Menu


Views: 29
Review of the Snark Rechargeable Clip-On Tuner (SN-RE)
The Snark Rechargeable Clip-On Tuner (SN-RE) has quickly become a favourite among musicians for its blend of convenience, accuracy, and eco-friendly design. Known for delivering high-quality tuning accessories, Snark once again impresses with the SN-RE. This review provides an in-depth look at the features and performance of the SN-RE, illustrating why it stands out in the tuner market.
Design and Build Quality
The Snark SN-RE features a sleek and compact design, adhering to the familiar clip-on style that Snark is known for. Its lightweight construction makes it easy to carry in your gig bag or pocket, yet it feels robust and durable, capable of withstanding regular use. The clip mechanism is strong and holds securely onto various instruments, including guitars, basses, ukuleles, and violins.
A key innovation in the SN-RE is its rechargeable battery, a feature that sets it apart from many competitors. This environmentally friendly battery eliminates the need for disposable batteries, reducing waste and saving money over time. A single charge can last for several weeks, depending on usage, providing major convenience for musicians.
Display and User Interface
The SN-RE boasts a bright, full-colour display that is easy to read in any lighting condition, whether on a dimly lit stage or in a bright room. The display is fully rotatable, allowing you to tilt and swivel it for optimal visibility from any angle, ensuring you can always see your tuning status clearly.
The user interface is straightforward, featuring a simple one-button operation that makes it easy to turn the tuner on and off. This simplicity is a significant advantage for musicians who need a reliable, no-fuss tuner. Although the SN-RE does not feature multiple tuning modes, its chromatic tuning capability makes it versatile enough to accommodate various instruments and tuning preferences.
Performance and Accuracy
The performance of the Snark SN-RE is exceptional. Known for its high accuracy, this tuner is crucial for any musician. It responds quickly to pitch changes, allowing for precise tuning with minimal effort. The SN-RE's clip-on mechanism effectively picks up vibrations from your instrument, ensuring reliable tuning even in noisy environments where traditional tuners might struggle.
Battery Life and Charging
One of the standout features of the SN-RE is its rechargeable battery. The tuner comes with a USB charging cable, and it takes only a couple of hours to fully charge. Once charged, the battery life is impressive, often lasting for several weeks depending on how frequently it is used. This long battery life makes it an ideal choice for musicians who play regularly and need a tuner that is always ready to go.
Additional Features
The Snark SN-RE includes a power-saving mode that automatically turns off the tuner when it is not in use. This feature helps conserve battery life, ensuring the tuner is available whenever you need it. Additionally, the SN-RE offers chromatic pitch calibration, allowing you to calibrate the tuner to a reference pitch between 415Hz and 466Hz, making it flexible for different tuning standards.
Feature List
Conclusion
In conclusion, the Snark Rechargeable Clip-On Tuner (SN-RE) is a top-tier tool for musicians seeking a reliable, accurate, and environmentally friendly tuning solution. Its rechargeable battery, bright and fully rotatable display, and high level of accuracy make it a standout product in the tuner market. The build quality and design are impressive, and the power-saving mode adds extra convenience.
The SN-RE is a worthwhile investment for any musician, offering a hassle-free tuning experience and ensuring that you always sound your best. Whether you are a beginner or a seasoned professional, this tuner provides the performance and reliability you need to keep your instrument in perfect tune.
Check price on Amazon https://amzn.to/3UTwMEx
The Snark Rechargeable Clip-On Tuner (SN-RE) has quickly become a favourite among musicians for its blend of convenience, accuracy, and eco-friendly design. Known for delivering high-quality tuning accessories, Snark once again impresses with the SN-RE. This review provides an in-depth look at the features and performance of the SN-RE, illustrating why it stands out in the tuner market.
Design and Build Quality
The Snark SN-RE features a sleek and compact design, adhering to the familiar clip-on style that Snark is known for. Its lightweight construction makes it easy to carry in your gig bag or pocket, yet it feels robust and durable, capable of withstanding regular use. The clip mechanism is strong and holds securely onto various instruments, including guitars, basses, ukuleles, and violins.
A key innovation in the SN-RE is its rechargeable battery, a feature that sets it apart from many competitors. This environmentally friendly battery eliminates the need for disposable batteries, reducing waste and saving money over time. A single charge can last for several weeks, depending on usage, providing major convenience for musicians.
Display and User Interface
The SN-RE boasts a bright, full-colour display that is easy to read in any lighting condition, whether on a dimly lit stage or in a bright room. The display is fully rotatable, allowing you to tilt and swivel it for optimal visibility from any angle, ensuring you can always see your tuning status clearly.
The user interface is straightforward, featuring a simple one-button operation that makes it easy to turn the tuner on and off. This simplicity is a significant advantage for musicians who need a reliable, no-fuss tuner. Although the SN-RE does not feature multiple tuning modes, its chromatic tuning capability makes it versatile enough to accommodate various instruments and tuning preferences.
Performance and Accuracy
The performance of the Snark SN-RE is exceptional. Known for its high accuracy, this tuner is crucial for any musician. It responds quickly to pitch changes, allowing for precise tuning with minimal effort. The SN-RE's clip-on mechanism effectively picks up vibrations from your instrument, ensuring reliable tuning even in noisy environments where traditional tuners might struggle.
Battery Life and Charging
One of the standout features of the SN-RE is its rechargeable battery. The tuner comes with a USB charging cable, and it takes only a couple of hours to fully charge. Once charged, the battery life is impressive, often lasting for several weeks depending on how frequently it is used. This long battery life makes it an ideal choice for musicians who play regularly and need a tuner that is always ready to go.
Additional Features
The Snark SN-RE includes a power-saving mode that automatically turns off the tuner when it is not in use. This feature helps conserve battery life, ensuring the tuner is available whenever you need it. Additionally, the SN-RE offers chromatic pitch calibration, allowing you to calibrate the tuner to a reference pitch between 415Hz and 466Hz, making it flexible for different tuning standards.
Feature List
- Rechargeable Battery: Environmentally friendly, long-lasting battery that can last for several weeks on a single charge.
- USB Charging: Comes with a USB charging cable for quick and easy recharging.
- Bright, Full-Color Display: Clear and easily readable in any lighting condition, with a fully rotatable head for optimal visibility from any angle.
- One-Button Operation: Simple and intuitive interface for easy use.
- Chromatic Tuning: Versatile tuning for a wide range of instruments.
- Chromatic Pitch Calibration: Allows for calibration to various reference pitches between 415Hz and 466Hz.
- Sturdy Clip Mechanism: Securely attaches to various instruments, ensuring stable and accurate tuning.
- Power-Saving Mode: Automatically turns off when not in use to conserve battery life.
Conclusion
In conclusion, the Snark Rechargeable Clip-On Tuner (SN-RE) is a top-tier tool for musicians seeking a reliable, accurate, and environmentally friendly tuning solution. Its rechargeable battery, bright and fully rotatable display, and high level of accuracy make it a standout product in the tuner market. The build quality and design are impressive, and the power-saving mode adds extra convenience.
The SN-RE is a worthwhile investment for any musician, offering a hassle-free tuning experience and ensuring that you always sound your best. Whether you are a beginner or a seasoned professional, this tuner provides the performance and reliability you need to keep your instrument in perfect tune.
Check price on Amazon https://amzn.to/3UTwMEx
Views: 81
A detailed review and comparison of the Shure SM58-LC Cardioid Dynamic Vocal Microphone and the Behringer ULTRAVOICE XM8500 Dynamic Cardioid Vocal Microphone.
Shure SM58-LC Cardioid Dynamic Vocal Microphone
Overview
The Shure SM58-LC is an industry-standard microphone that has been a favourite among performers and audio engineers for decades. Known for its durability, reliability, and consistent performance, the SM58-LC is a go-to choice for live vocals, public speaking, and studio recording.
Key Features
1. Build Quality: The SM58-LC is renowned for its robust construction. It features a steel mesh grille and a sturdy metal body that can withstand rough handling and harsh environments.
2. Sound Quality: It offers a warm, clear sound that is particularly well-suited for vocal performances. The tailored frequency response emphasizes midrange and bass frequencies, making vocals sound rich and full.
3. Polar Pattern: The cardioid polar pattern effectively isolates the main sound source while minimizing background noise, which is ideal for live sound applications.
4. Pneumatic Shock-Mount System: This feature reduces handling noise, ensuring that the sound is clean and free of unwanted vibrations.
5. Frequency Response: Ranges from 50 Hz to 15 kHz, providing a balanced and natural sound for a variety of vocal styles.
Pros
Cons
Behringer ULTRAVOICE XM8500 Dynamic Cardioid Vocal Microphone
Overview
The Behringer ULTRAVOICE XM8500 is a budget-friendly microphone that offers surprisingly good performance for its price. It is often chosen by beginners and those looking for an affordable yet effective microphone for various vocal applications.
Key Features
1. Build Quality: The XM8500 has a solid build with a metal body and steel mesh grille. While not as indestructible as the SM58, it is quite durable for its price range.
2. Sound Quality: It delivers a decent sound quality with a frequency response that is tailored to vocal frequencies. The sound is slightly less refined compared to the SM58 but still quite good for most uses.
3. Polar Pattern: Like the SM58, it has a cardioid polar pattern that helps to isolate the sound source and minimize background noise.
4. Shock Mount System: Includes an integrated shock mount to reduce handling noise, though not as sophisticated as the Shure's pneumatic system.
5. Frequency Response: Ranges from 50 Hz to 15 kHz, which is similar to the SM58 and suitable for vocal applications.
Pros
Cons
Comparison
Sound Quality
Build Quality
Features
Price
Conclusion
The choice between the Shure SM58-LC and the Behringer ULTRAVOICE XM8500 depends largely on your needs and budget:
Ultimately, both microphones have their place in the audio world. The SM58-LC is the benchmark for professional dynamic microphones, while the XM8500 provides an accessible entry point with commendable performance for its price, and also a great microphone to use as a backup or spare mic should you need one.
Shure SM58-LC: Check price on Amazon https://amzn.to/3UTSZT2
Behringer XM8500: Check price on Amazon https://amzn.to/45dewed
Shure SM58-LC Cardioid Dynamic Vocal Microphone
Overview
The Shure SM58-LC is an industry-standard microphone that has been a favourite among performers and audio engineers for decades. Known for its durability, reliability, and consistent performance, the SM58-LC is a go-to choice for live vocals, public speaking, and studio recording.
Key Features
1. Build Quality: The SM58-LC is renowned for its robust construction. It features a steel mesh grille and a sturdy metal body that can withstand rough handling and harsh environments.
2. Sound Quality: It offers a warm, clear sound that is particularly well-suited for vocal performances. The tailored frequency response emphasizes midrange and bass frequencies, making vocals sound rich and full.
3. Polar Pattern: The cardioid polar pattern effectively isolates the main sound source while minimizing background noise, which is ideal for live sound applications.
4. Pneumatic Shock-Mount System: This feature reduces handling noise, ensuring that the sound is clean and free of unwanted vibrations.
5. Frequency Response: Ranges from 50 Hz to 15 kHz, providing a balanced and natural sound for a variety of vocal styles.
Pros
- Durability: Can withstand extreme conditions and rough handling.
- Sound Clarity: Excellent for live vocals with a clear and warm sound.
- Reputation: Trusted and widely used in professional settings.
- Minimal Feedback: Cardioid pattern effectively reduces feedback and background noise.
Cons
- Price: More expensive compared to other dynamic microphones.
- Weight: Heavier than some competitors, which might be a consideration for long performances.
Behringer ULTRAVOICE XM8500 Dynamic Cardioid Vocal Microphone
Overview
The Behringer ULTRAVOICE XM8500 is a budget-friendly microphone that offers surprisingly good performance for its price. It is often chosen by beginners and those looking for an affordable yet effective microphone for various vocal applications.
Key Features
1. Build Quality: The XM8500 has a solid build with a metal body and steel mesh grille. While not as indestructible as the SM58, it is quite durable for its price range.
2. Sound Quality: It delivers a decent sound quality with a frequency response that is tailored to vocal frequencies. The sound is slightly less refined compared to the SM58 but still quite good for most uses.
3. Polar Pattern: Like the SM58, it has a cardioid polar pattern that helps to isolate the sound source and minimize background noise.
4. Shock Mount System: Includes an integrated shock mount to reduce handling noise, though not as sophisticated as the Shure's pneumatic system.
5. Frequency Response: Ranges from 50 Hz to 15 kHz, which is similar to the SM58 and suitable for vocal applications.
Pros
- Affordability: Significantly cheaper than the SM58, making it accessible for budget-conscious users.
- Decent Build Quality: Solid and durable for its price range.
- Good Sound Quality: Provides a clear and usable sound for various vocal tasks.
- Low Handling Noise: Integrated shock mount helps reduce handling noise.
Cons
- Sound Refinement: Not as refined or warm as the SM58.
- Durability: While durable, it is not as robust as the SM58.
- Brand Reputation: Behringer is often seen as a budget brand, which might influence professional perception.
Comparison
Sound Quality
- Shure SM58-LC: Offers superior sound quality with a warmer and clearer tone, particularly well-suited for professional vocal performances. The midrange emphasis helps vocals cut through the mix in live settings.
- Behringer XM8500: Provides good sound quality for its price but lacks the same level of refinement and warmth found in the SM58. It is adequate for many uses but might fall short in professional or critical listening environments.
Build Quality
- Shure SM58-LC: Known for its legendary durability, the SM58 can handle extreme conditions and rough use without compromising performance.
- Behringer XM8500: Has a solid build that is impressive for its price range but does not match the robustness of the SM58. It should still hold up well under normal use.
Features
- Shure SM58-LC: Offers advanced features like the pneumatic shock-mount system, which effectively reduces handling noise, and a finely tuned frequency response for vocals.
- Behringer XM8500: Includes basic features such as an integrated shock mount and a cardioid polar pattern but lacks the advanced engineering of the SM58
Price
- Shure SM58-LC: Higher price point, justified by its superior sound quality, durability, and professional-grade performance.
- Behringer XM8500: Very affordable, making it a great choice for beginners, hobbyists, or those needing a decent microphone on a tight budget.
Conclusion
The choice between the Shure SM58-LC and the Behringer ULTRAVOICE XM8500 depends largely on your needs and budget:
- Shure SM58-LC: If you are a professional performer, sound engineer, or someone who needs a reliable microphone for frequent and demanding use, the SM58-LC is worth the investment. Its superior sound quality, exceptional durability, and professional reputation make it a staple in the industry.
- Behringer XM8500: If you are on a budget, a beginner, or need a microphone for less critical applications, the XM8500 is a fantastic option. It offers good performance at a fraction of the cost of the SM58 and is suitable for a wide range of uses, from home recording to casual live performances.
Ultimately, both microphones have their place in the audio world. The SM58-LC is the benchmark for professional dynamic microphones, while the XM8500 provides an accessible entry point with commendable performance for its price, and also a great microphone to use as a backup or spare mic should you need one.
Shure SM58-LC: Check price on Amazon https://amzn.to/3UTSZT2
Behringer XM8500: Check price on Amazon https://amzn.to/45dewed


Views: 2720
TONEX REVIEW
AI Machine Modeled tone creator, player, browser
TONEX by IK Multimedia
Review by Howard Worf for guitaristguild.com
Guitarist Guild would like to thank IK Multimedia for providing the licence to enable us to complete this review.
All of the opinions expressed in this review are mine and mine alone.
So another exciting launch from IK Multimedia – at least I think so. Can't afford a hardware modeller, but have a laptop and audio interface? This is where you go.
INTRODUCTION
First a few bits of technical stuff:
What you will need (other than a guitar, amp and computer of some description):
- An audio interface with at least two inputs (one Hi Z for your instrument) and two outputs.
- A decent microphone or 2
- A monitoring system of some kind, preferably full range with a flat response curve (FRFR).
- A Re-Amplification box if you need to match the output of your interface to amp input.
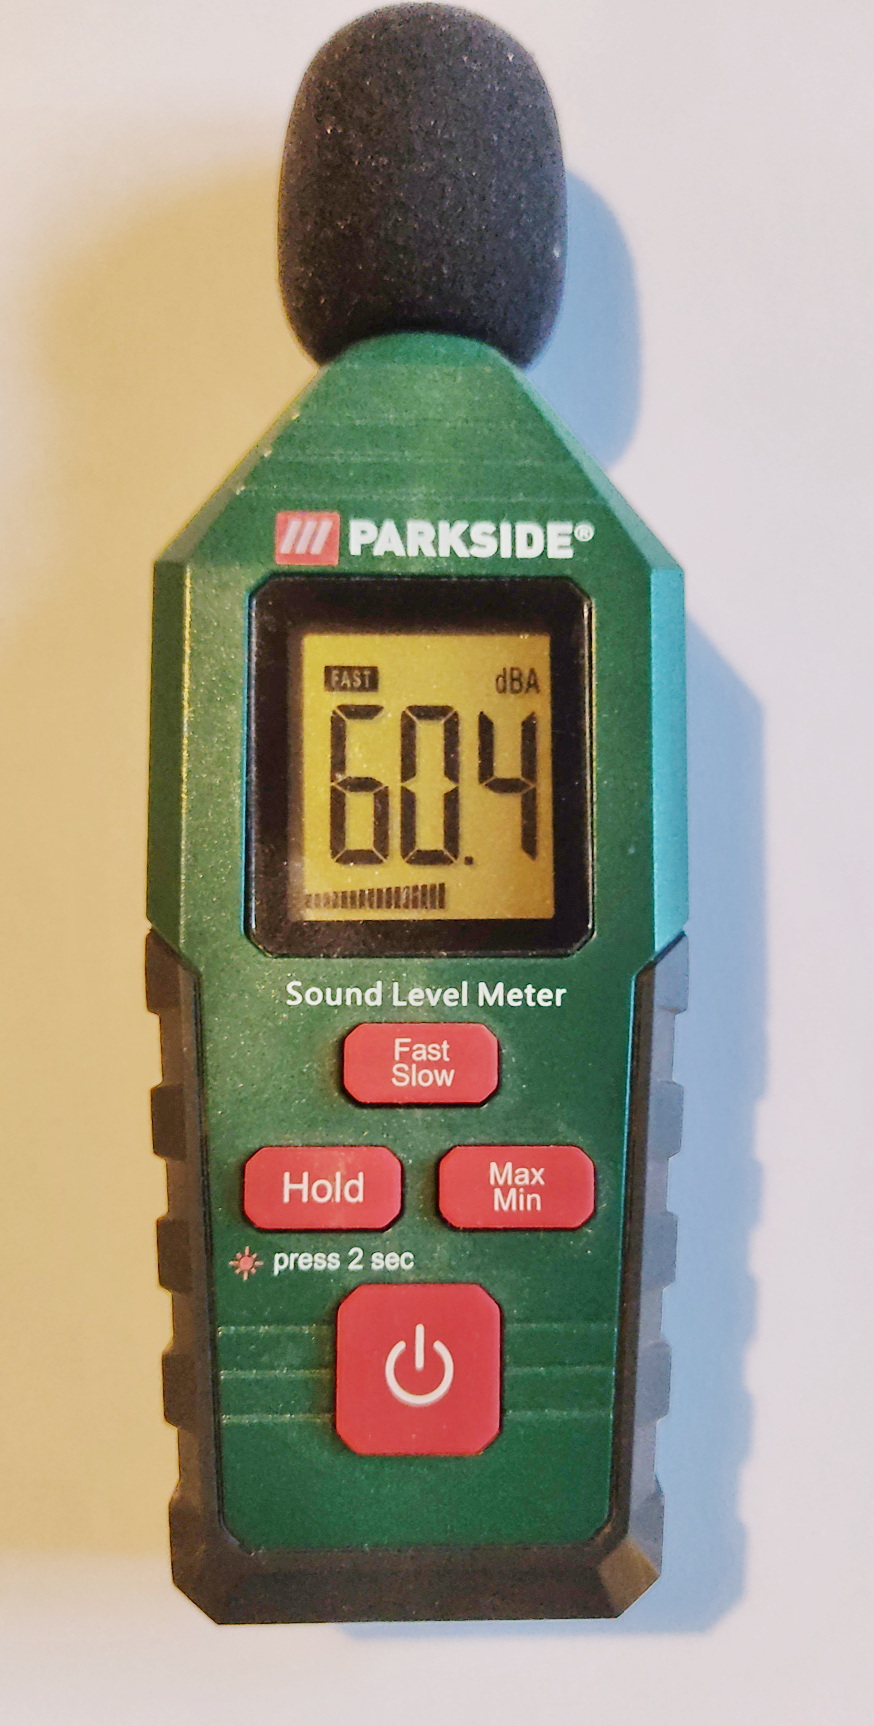
- Not on the list provided by IK Multimedia, but a decibel meter looks like a very useful if not essential addition to the equipment list for using the modeller.
Mac/PC/iOS for iPhone/iPad
Stand alone, VST, AAX for your DAW
Has it's own unique tone modelling
CS version 20 tone models -10 amps, 5 pedals
SE version 200 tone models -20 amps, 10 pedals
Standard 400 tone models – 40 amps, 20 pedals (at time of writing same price as SE version)
Max version – 1000 tone models, 100 amps, 50 pedals
No time based modulation available (reverb, delay, phaser, flanger etc)
Integrates with the latest iteration of Amplitube 5 (5.5.2)
Captures and models your own rigs, more of which later
Will only capture tone, so don't think about modelling any reverb, delay, phaser, flanger or anything of that ilk
To find a Tonex modelled amp in Amplitube select the Amp rack and scroll to the bottom, for a Tonex stomp choose the stomp rack (make sure you have the latest versions of both Tonex and Amplitube) and do the same. Tonex will now load.
CONCLUSION
I for one am ecstatic – I have been able to model the response from my favourite bass amp, an old Trace Elliot GP7SM200, and it's perfect. I've also captured some of my favourite tones from my Fender Mustang V2 and Zoom G3X. Processing a capture does take quite a while on my laptop (several hours) but the result is worth the wait. In a word, the models are astonishingly good.
Like all IK Multimedia's guitar software the library of sounds it is a lot of fun and delivers realistic tones. The included presets tend to be towards to the heavier end of guitar sounds. The clean tones are equally impressive even if clean tones can, in my opinion, almost always benefit from at least a little modulation which Tonex alone cannot provide. That said the reverb is extremely good. But you probably won't be using this as a stand alone application when recording, either running the tones through Amplitube 5 or your favourite DAW.
Once you have created a captured tone you cannot really alter it – so take care about the tones you map. My gut feeling is that it is best to just model the amplifier and cabinet, adding your preferred stomp boxes into the signal chain when playing either physically or through Amplitube, rather than model a particular stomp effect which you will not be able to alter in performance. There is, of course, nothing to stop you modelling just about any (non modulated) sound you can create with your physical gear.
The $64k question is should you buy this software? I think the answer has to be that if you are happy with Amplitube 5 and don't want to capture any additional tones you probably should not. Amplitube 5 is extremely versatile and customisable and will probably be all you need. But . . capturing and then being able to replicate your own tones anywhere is simply brilliant and once you have started you won't want to stop.
GETTING STARTED
You will need IK Multimedia's Product Manager. If you have any other IK Multimedia's products make sure they are all up to date. Tonex will only integrate with the latest version of Amplitube. You might wish to update Amplitube 5 after you install Tonex – there is some suggestion on the web that doing it the other way around won't work, although it did for me. Installing on my Windows 10 laptop involved having to go to the download temp file and run the installer as administrator.
The style of the UI will be familiar to you if you have used Amplitube, the same dark greys and white text. By default the application opens with the Audio settings/account/info window. The audio setting options I found a little strange.

If I chose the windows audio option from the Technology drop down menu the ASIO interface appears as an option, but the interface itself does not, just generic ASIO.

If instead I chose ASIO then with the Behringer the input device is automatically the UMC ASIO driver.
The default buffer size for my systems is 512 which works. I did experiment with 256 and that seemed to work well too. But there was nothing much to be gained from doing so. So I stuck with the default 512 and left it at that.
GETTING SOME TONES
After setting up your audio interface you'll want to start exploring the tones. Thanks to ToneNET these are legion, although the max pack come loaded with more than a thousand models
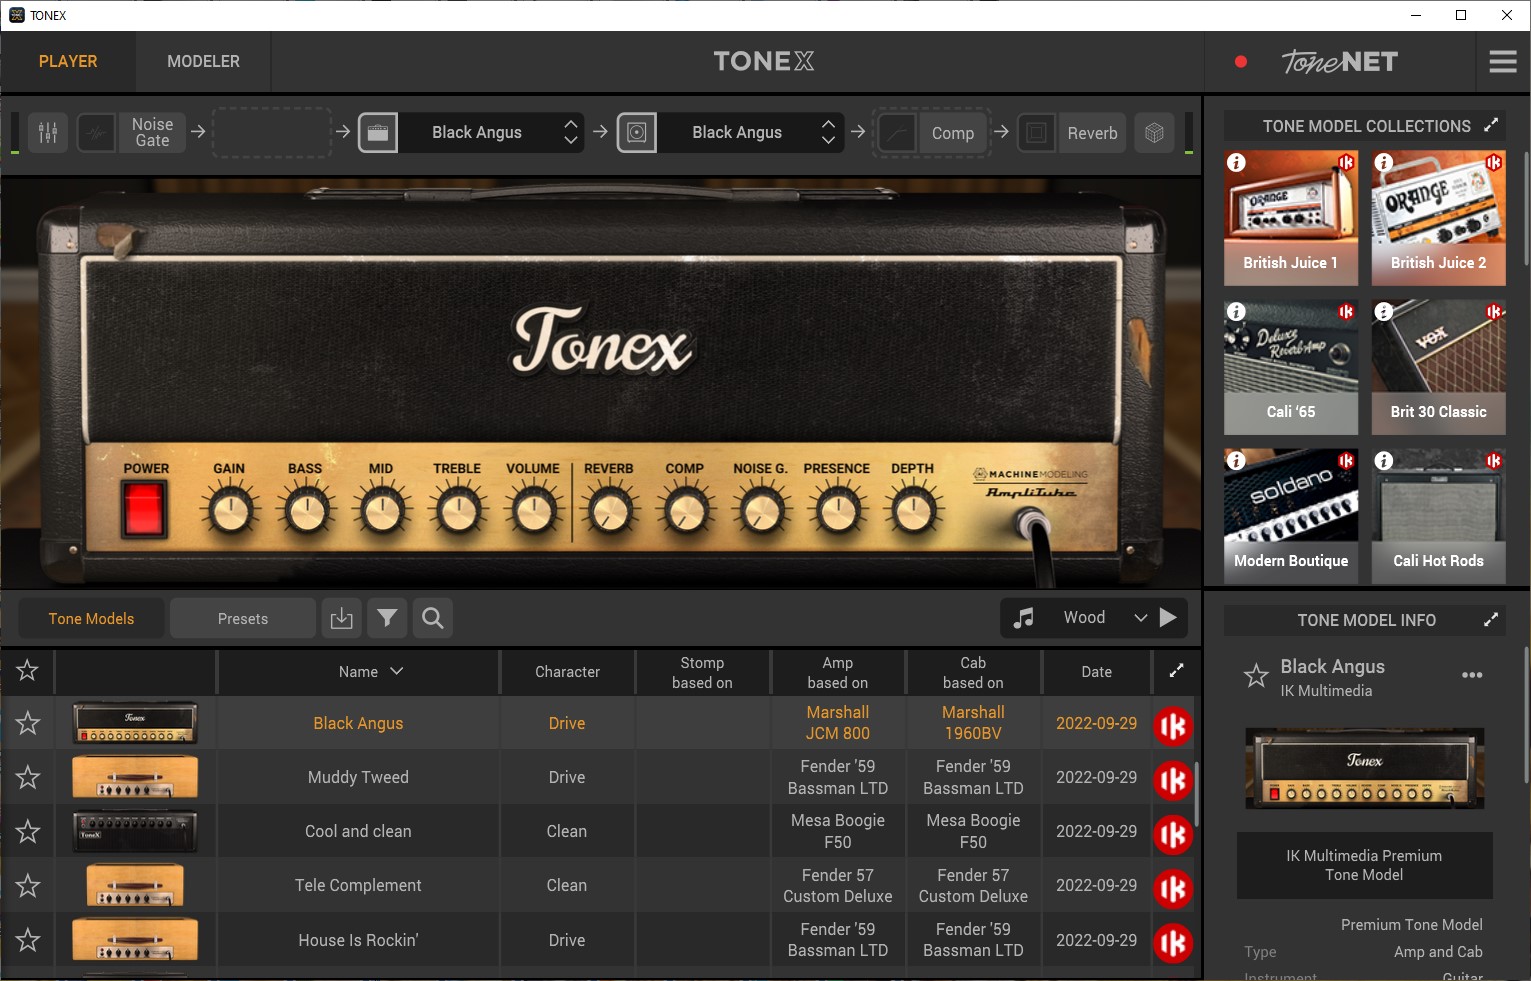
When you open the app you are using the start up tone based on a Marshall JCM800. What's not to like?
- Filter using the funnel symbol and choosing the features you want to see.
- Search directly using the magnifying glass symbol
- Sort any of the columns into alphabetical order
- Show only your favourites
TONE MODELS
Tone models are just that – the unadulterated models. The descriptions are self evident so I shall not dwell on the various columns, except to say that the first column is where you can mark favourite tones, making them easy to recall the ones you like the most. In the top right hand corner you can see the Tone Models Collections window. There are a lot more than the 6 you can see – scroll down for loads more. Very helpful as a starting point navigating the huge choice and variety of tone models available.
Beneath that is a window giving the details of the tone model.
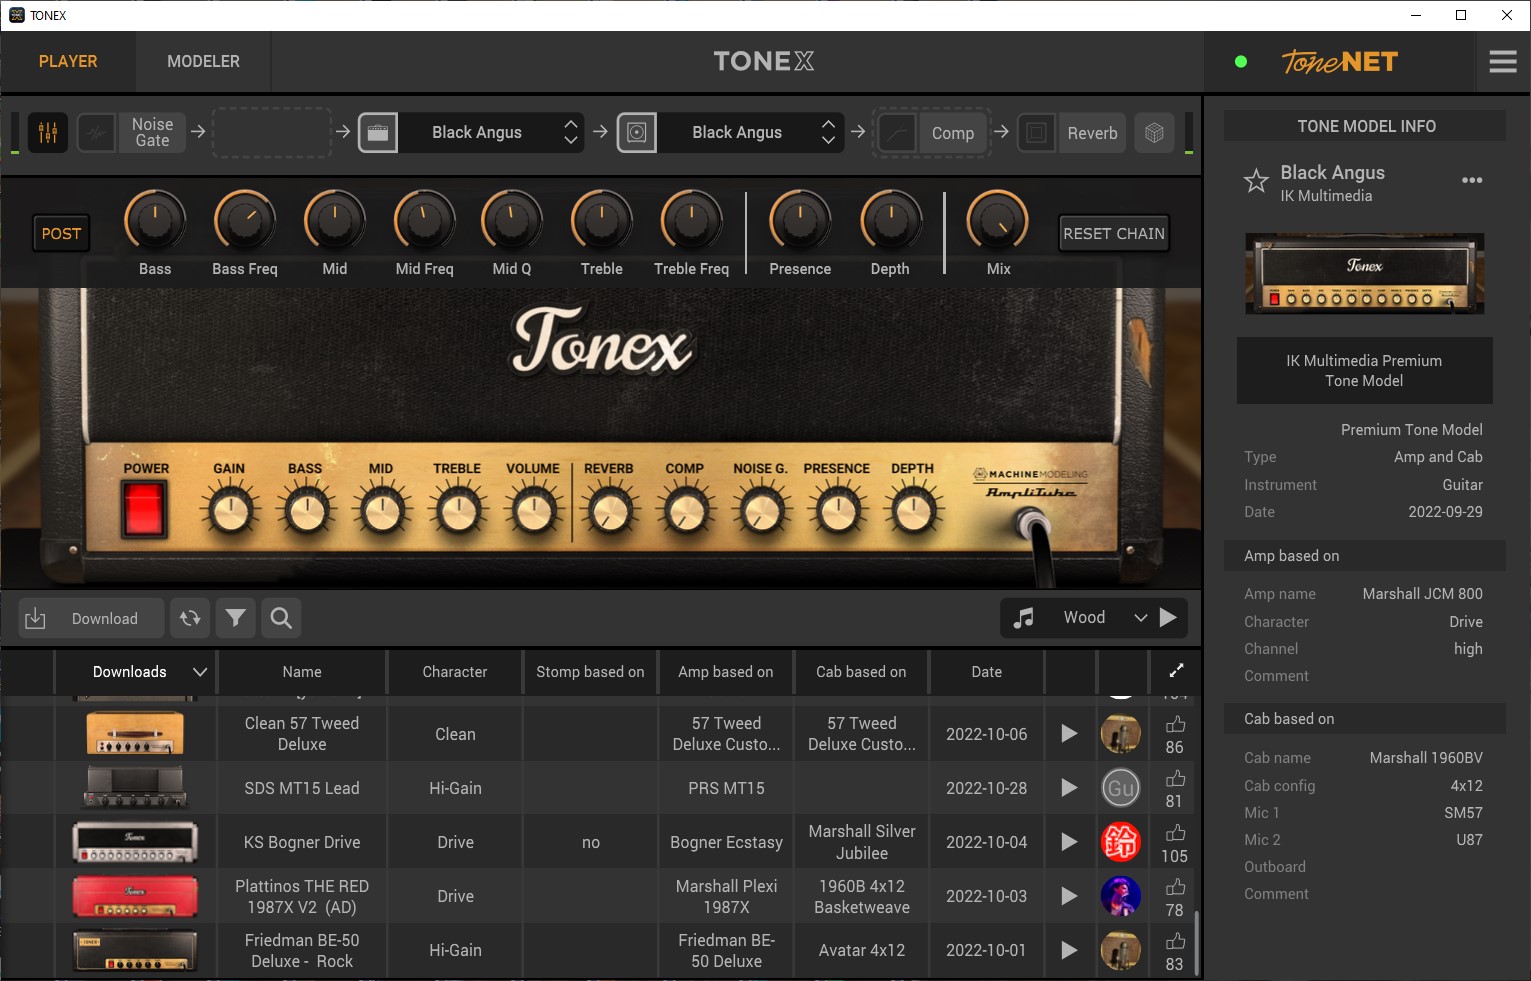
The top bar contains controls for the EQ, noise gate, amp model choice, cab choice, compression, reverb and microphone choice and placement. Note that there is no window for stomp – in the Tone Models window stomps cannot be changed. The elements that are active for each model or preset are shown in white. Play with these as you wish, turn them on and off, alter the parameters.
The effects signal chain will change depending upon whether the EQ and/or compressor are set to pre or post relative to the tone module (amp and cab). The noise gate is always at the start and reverb always at the end.
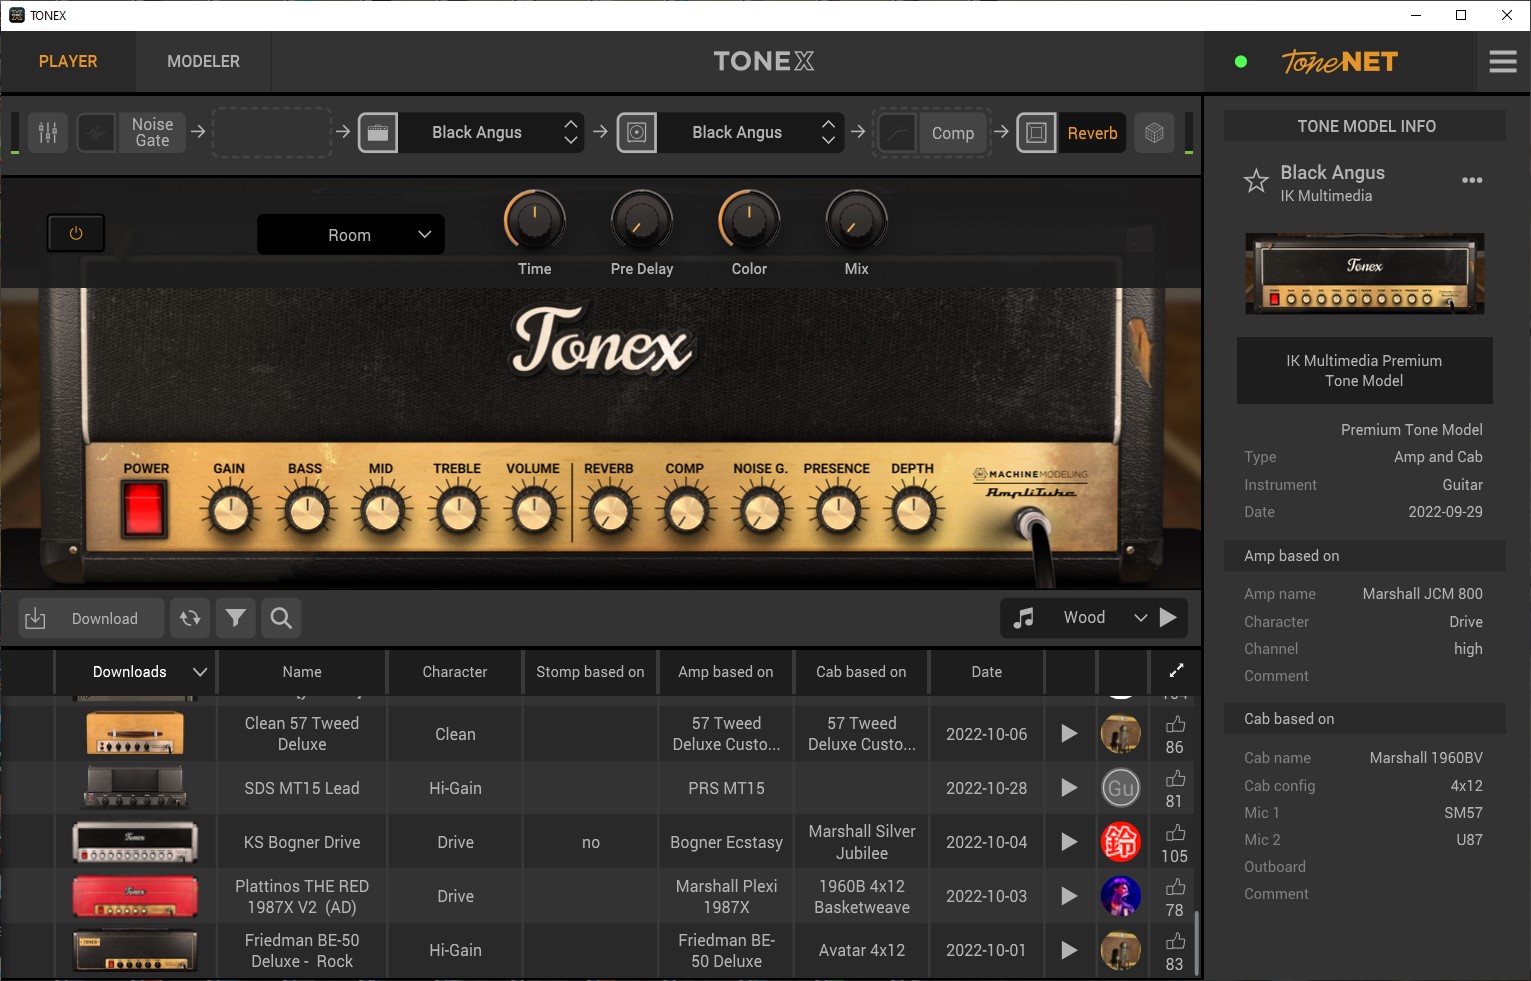
At this juncture I would like to say how excellent I found the reverb to be: smooth, open, very realistic – a gem. You can, of course, save any changes you make (open box with down arrow next to the Presets button) but note your modified tone becomes a preset.

A couple of screenshots of the controls for the EQ and the reverb:
PRESETS
This is the other tone area. These are modelled tones with various tweaks. Again the signal paths are altered by setting EQ and/or compressor to pre or post the amp and cab. The window is a little different from the Tone Models window, in the that second column now shows the preset signal chain. You can modify the effects chain in the same way as with the tone models. The search functions are the same. Again, you can favourite the tones you like the best in order to load them quickly again.

TONENET
This is IK Multimedia's huge online tone and preset library for both Tonex and Amplitube 5. I will not go into detail here other than in how it enables you to share your modelled tones with the world and download and use the thousands of others provided by the community of users. You connect by clicking in the ToneNET box and when you have a successful connection the red indicator turns green. You can now exchange tones with the world. Downloaded tones are added to your local library.
MODELLING
Let's face it, this feature is most likely the reason why you are are interested in Tonex.
It's quite a process, but the UI guide is very clear, just make sure you read it carefully as you go along. Here is how it works:
You MUST have
- A guitar or bass
- An amplifier
- A speaker cabinet (or both in a combo)
- A computer (or iPad/iPhone – I do not have either so can't comment on their functionality)
- An audio interface with at least 2 inputs and 1 output – I used a Steinberg UR22 for modelling with my laptop (I did not always use my re-amp box and could not tell much, if any, difference in the resulting tone models with my old ears)
- A decent microphone or two
You might like to have
- A decibel meter – Amazon sell one for less than €30. For this use it does not have to be a calibrated meter. Mine was from Lidl (I couldn't find my calibrated one).
- A re-amplification box to match input to your amp. Tonex Capture from IK Multimedia is €299 including VAT, including Tonex SE (on it's own €179.99 including VAT) with 200 tone models. The Palmer DACCAPO is €79 from Thomann.
- A DI box if you aren't using a microphone or a DI output from your rig.
- A boom microphone stand or two
Having gathered your items together there is some wiring to be done.
Connect your interface to your computer and make sure that you have selected the correct audio device from the Tonex audio interface page. If you can't see it, click on the 3 horizontal lines to the right of the ToneNET logo in the top right of the UI.
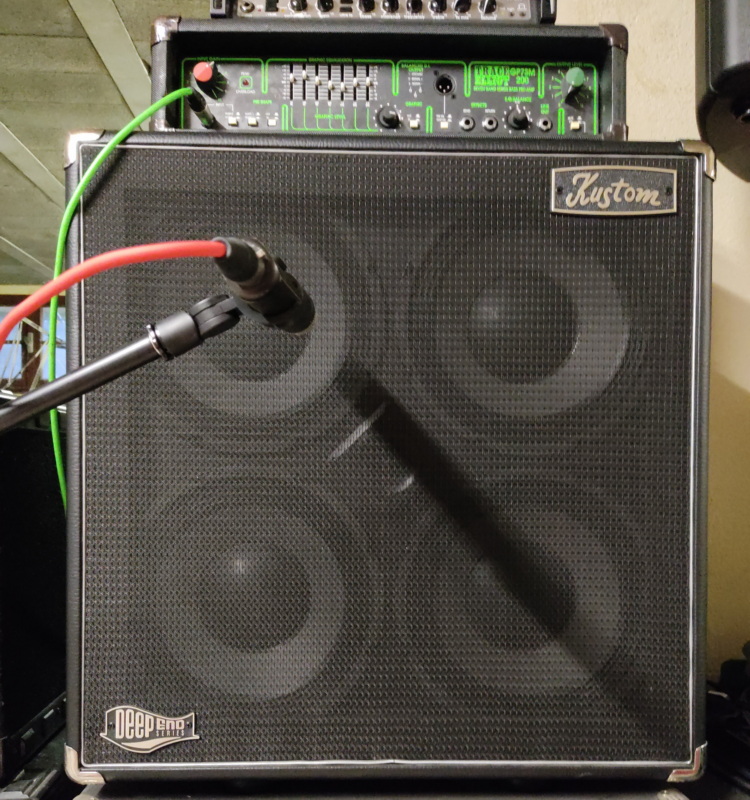
Set up your guitar and amplifier/cabinet and place your microphone or microphones (if using more than one your interface has to have 3 input channels).
Play your instrument through your rig as usual and measure or gauge the volume – this is important and not mentioned in the instructions until you are some way through the process.
Open the Tonex Modeller
You will see the welcome screen – click next and you will have the choice of guitar or bass as source.
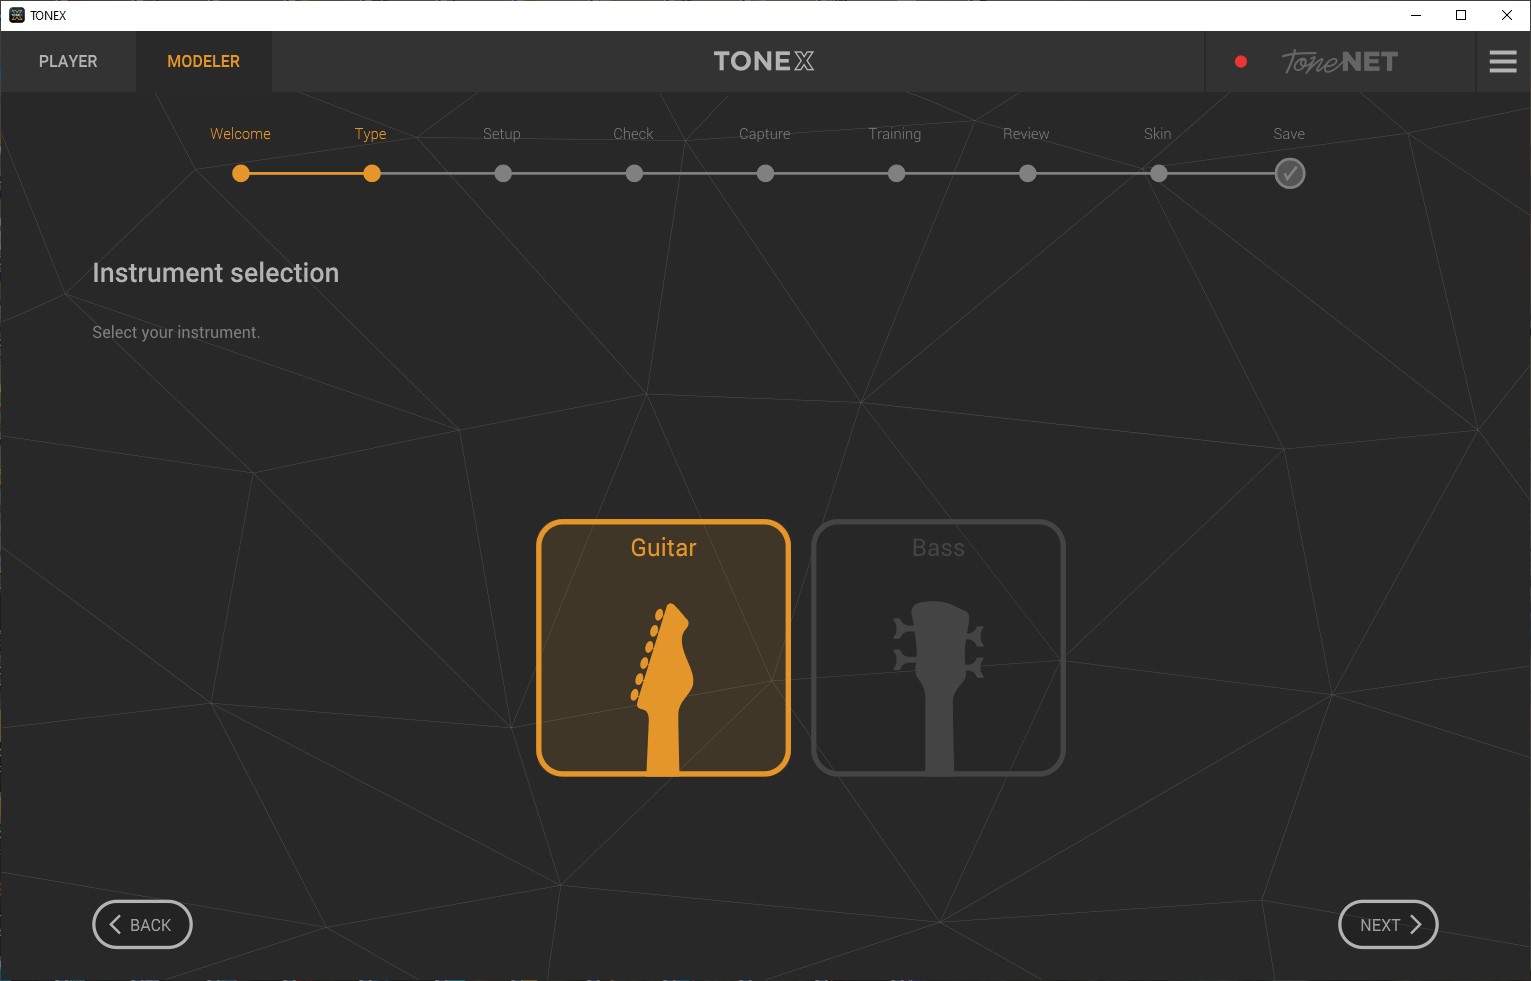
Make your selection and then move on to the next screen.
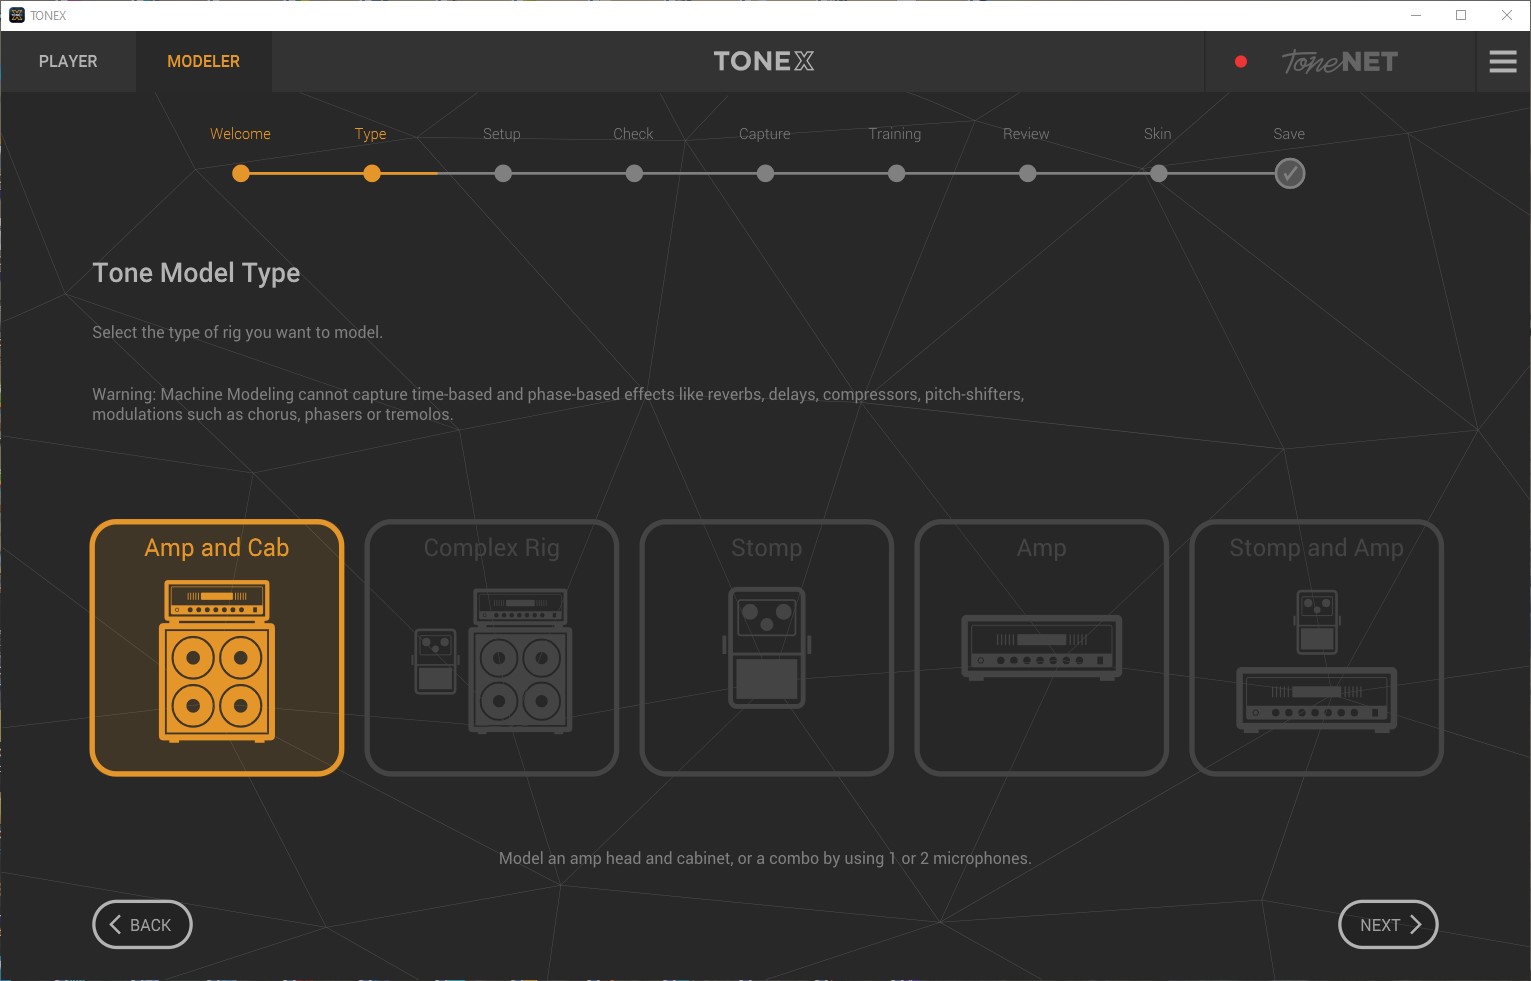
The next page asks you select your rig. Self explanatory.
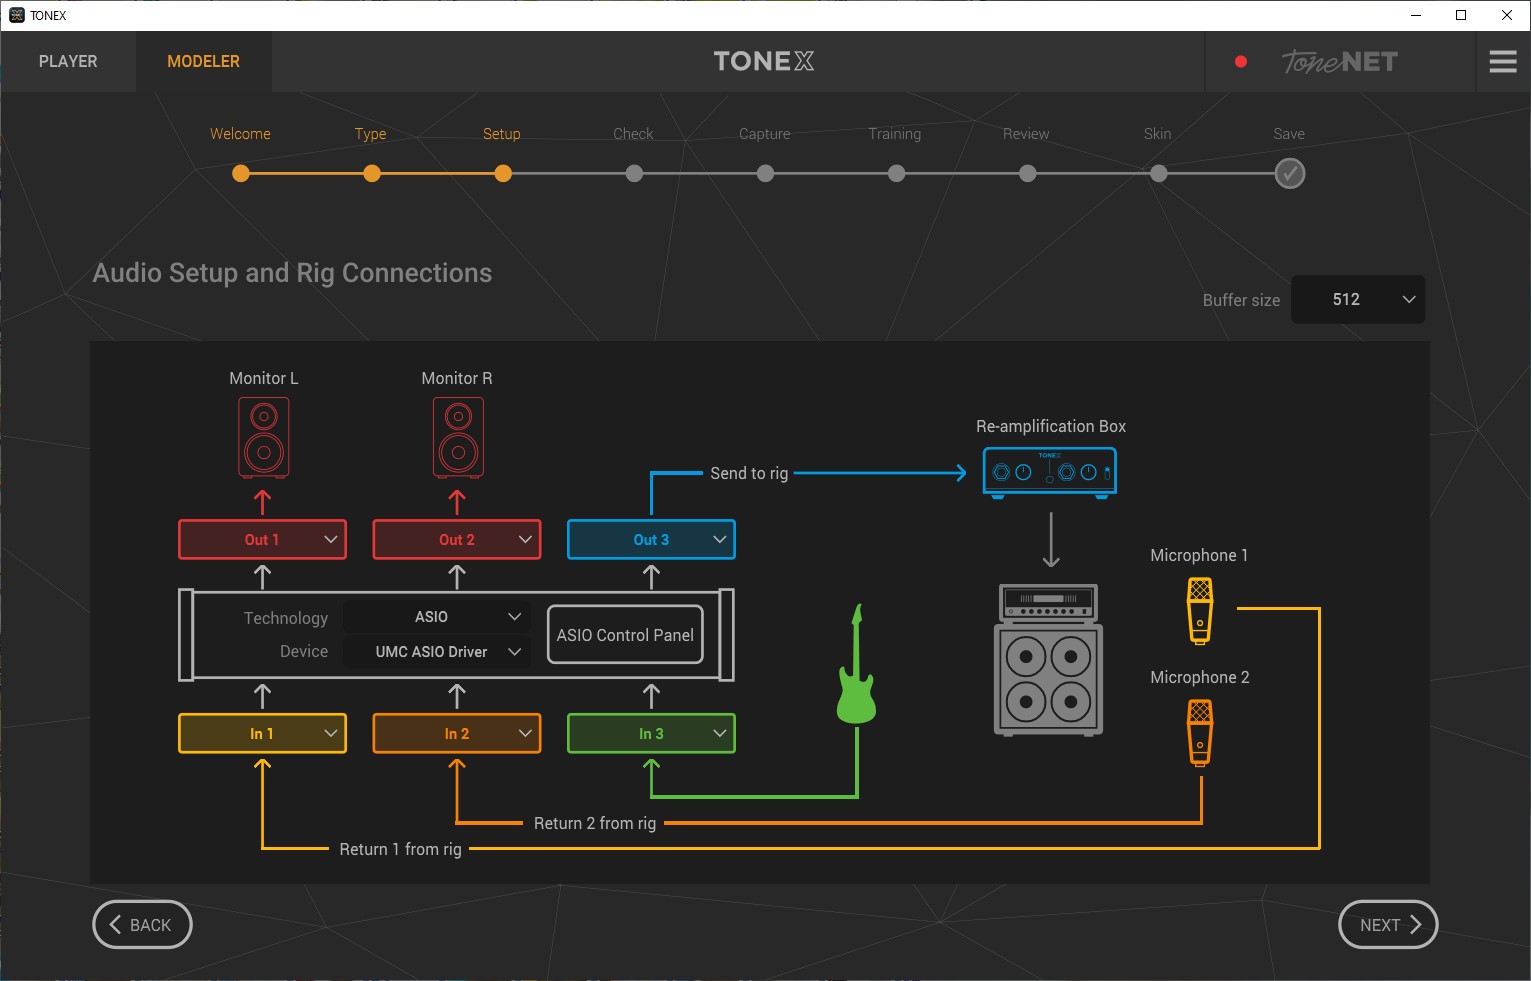
In the next window – setup you tell Tonex about your signal path – which inputs you have the microphone and instrument plugged into, which outputs are going to the monitors and which output is your return to rig. I did not always use the re-amplification box and if you don't just imagine that the send to rig path is only going to the input on your chosen rig. Example UR22:
Example UMC404HD:
Next up is setting the instrument input level. Note the direction to use a Hi-Z input. If your guitar or bass is active you may have to use a pad cut. I found this was not necessary using my interfaces as there was sufficient headroom in the Hi-Z gain controls.

Play your instrument to set the input levels. The meter will turn red if the levels are too high.
On the next page you have to set the send level to your rig (via the interface output and/or re-amplification box) to match the levels you get when playing directly through your rig. Hence my suggestion that you start by playing your instrument through your rig and establishing the volume level – I found the decibel meter to be invaluable for this.
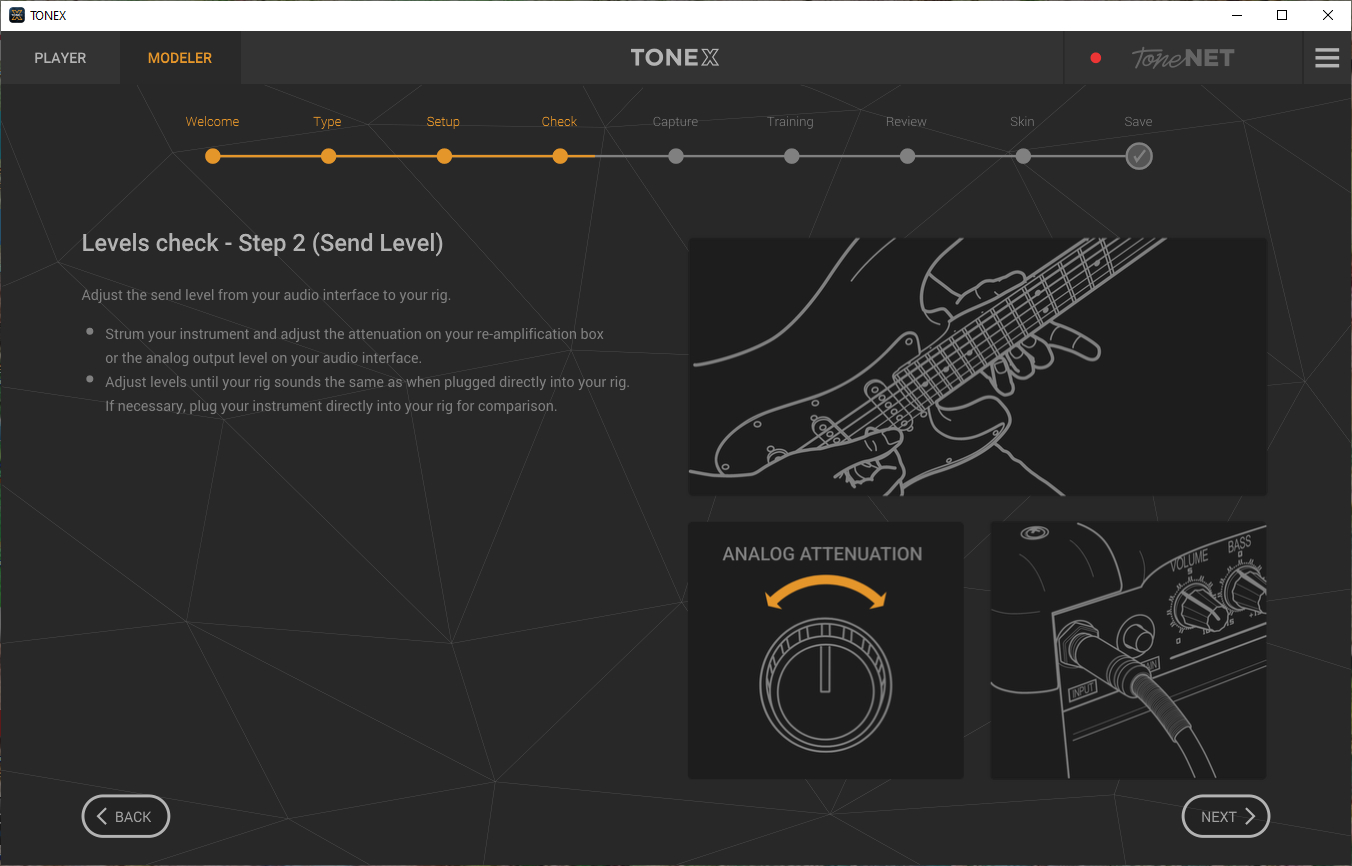
(As an aside, I found that I couldn't model DI direct from Ampeg's DI out – high noise levels reported that would affect the accuracy of the model, so I miked it up instead)
The next page is the return levels, the levels coming into the interface from your microphone(s). Here I suggest that you use one of the installed samples from the drop down box. For guitar I used 'space' and for bass 'bass'.
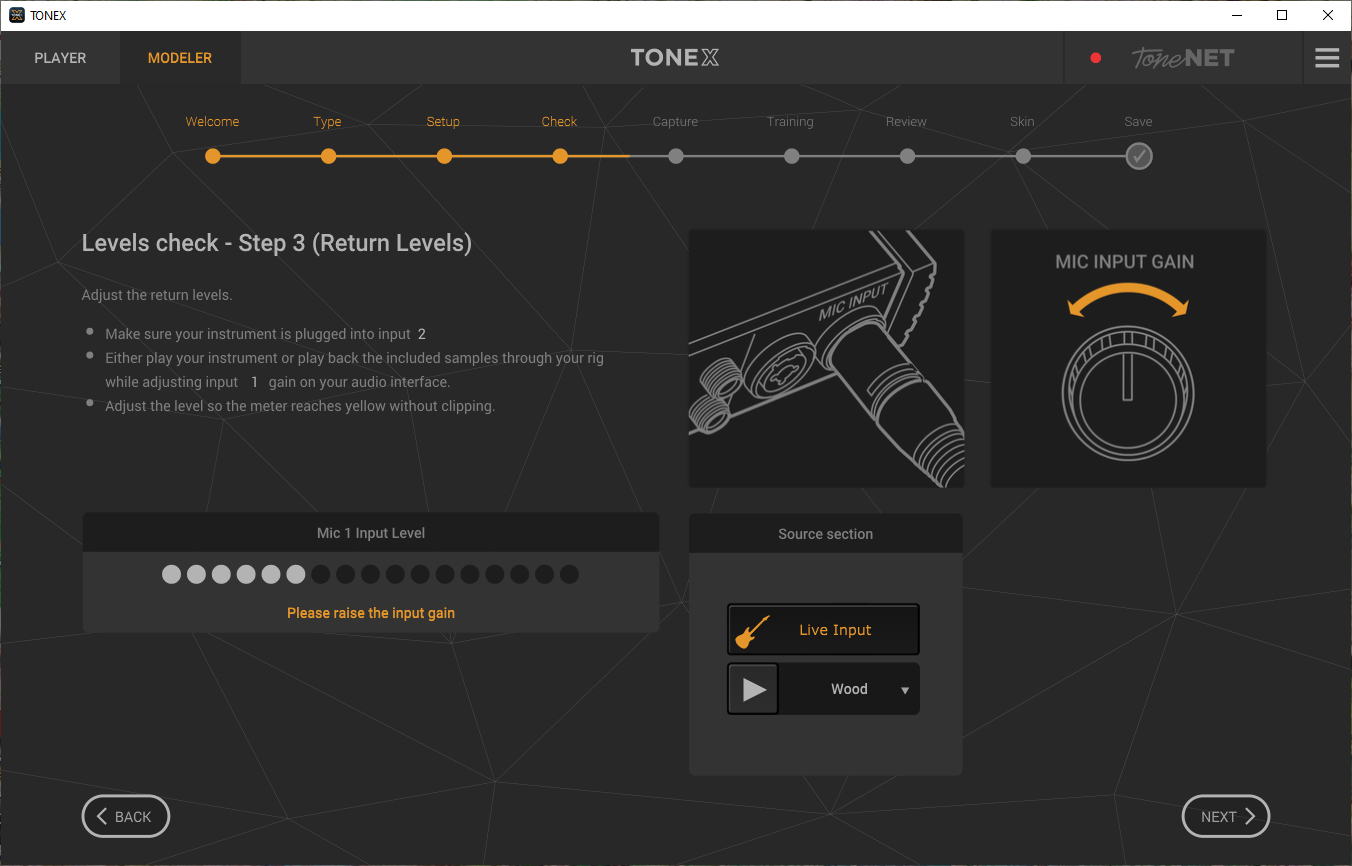
Having set the return levels you move onto capture.

Click the 'capture' button and Tonex will start playing its modelling tone set through your rig. As it does so the capturing process circle will advance clockwise filling with green until the capture is completed.
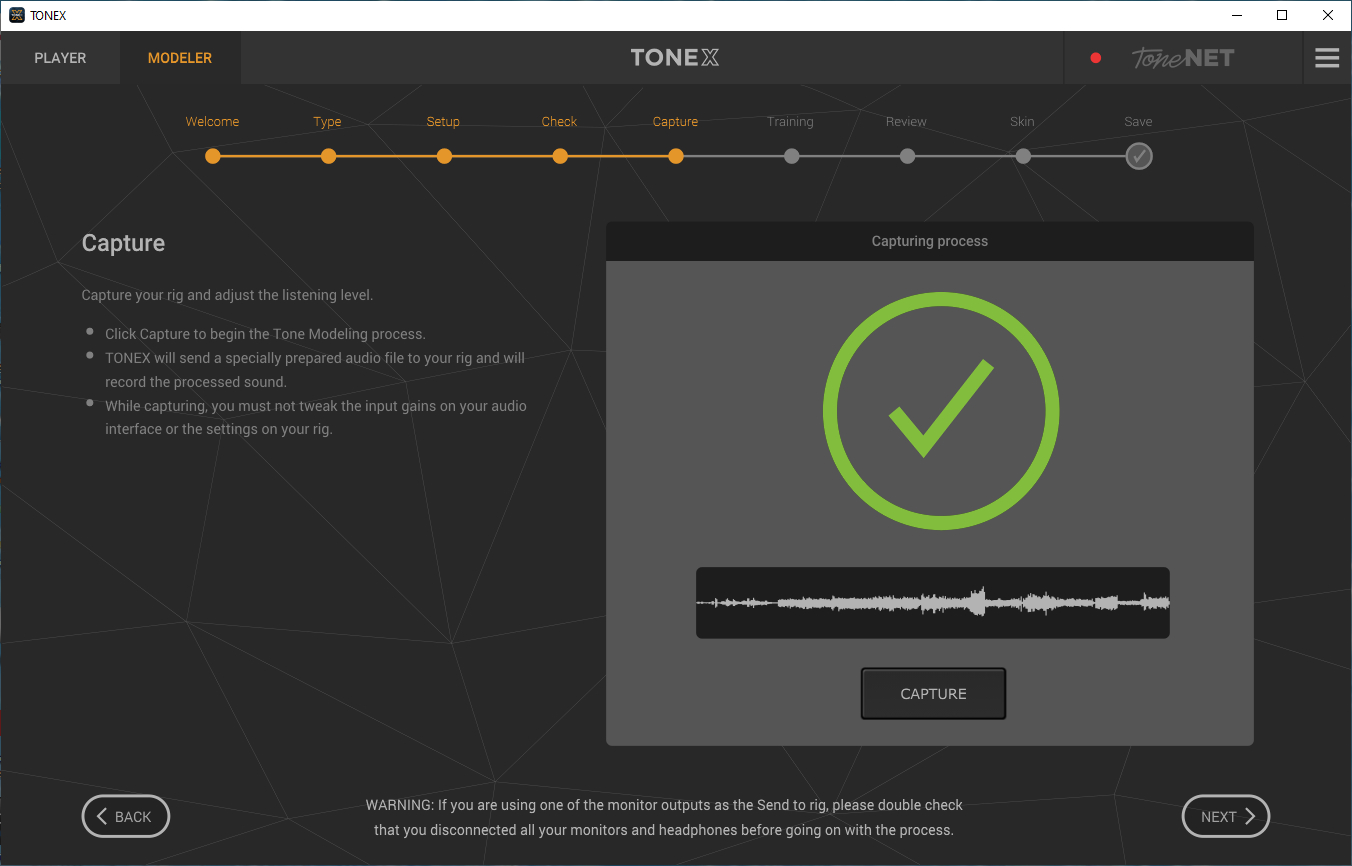
The AI will run,

and when completed you will see this window:
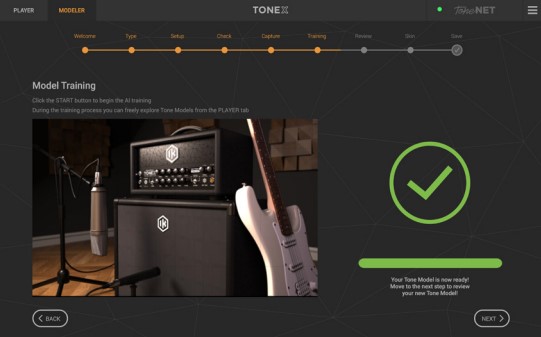
With the AI training has finished you can audition the newly created model before saving it. You might have to remove the connection path that goes from your interface to the amplifier and replace it with a path to your monitors – as below with the UR22.


The last thing to do is to save your model. Here is a screenshot of the page for saving one of my favourite tones from the venerable Zoom G3X:

Click on save and go to the player. Enjoy your new sound.
If you are so inclined you can now upload this to ToneNET – choose an appropriate demo sound – I use 'space' for guitar and 'bass' for bass. The choice is yours.
You can play with some of the tones I created for this review by opening ToneNET and searching for 'H the Bass'.
Things used in this review:
PCs: 9 year old desktop AMD FX8, 16gb ram, laptop ASUS VivoBook 15, 6gb ram
DAWs – Cubase Pro 11 (12 won't run on my old desktop), Studio One 5 Professional, and Reaper 6.71
Monitoring – Behringer Truth B2031A near field, AKG K240 headphones
ASIO Interfaces – Steinberg UR22, Behringer UMC404HD
Re-Amplifier – Palmer DACAPPO
DI Box – Behringer DI 100 Ultra DI
OS – Windows 10 Home
Amplifiers – Combos: Fender Mustang 3 V2, Fender Champion 100 2x12, Heads: Ampeg Portaflex 500, Trace Elliot GP7SM200
Cabinet – Kustom DeepEnd 4x10
Guitars - Epiphone Prophecy GX, Schecter Banshee Diamond Extreme, Schecter Omen 6, Harley Benton Fusion Pro ll HH, Ibanez SG300EB, and Marcus Miller M7 V2
PA – Mixer (run flat) Behringer PMP6000, and the Box PA302s.
CONCLUSION
I for one am ecstatic – I have been able to model the response from my favourite bass amp, an old Trace Elliot GP7SM200, and it's perfect. I've also captured some of my favourite tones from my Fender Mustang V2 and Zoom G3X. Processing a capture does take quite a while on my laptop (several hours) but the result is worth the wait. In a word, the models are astonishingly good.
Like all IK Multimedia's guitar software the library of sounds it is a lot of fun and delivers realistic tones. The included presets tend to be towards to the heavier end of guitar sounds. The clean tones are equally impressive even if clean tones can, in my opinion, almost always benefit from at least a little modulation which Tonex alone cannot provide. That said the reverb is extremely good. But you probably won't be using this as a stand alone application when recording, either running the tones through Amplitube 5 or your favourite DAW.
Once you have created a captured tone you cannot really alter it – so take care about the tones you map. My gut feeling is that it is best to just model the amplifier and cabinet, adding your preferred stomp boxes into the signal chain when playing either physically or through Amplitube, rather than model a particular stomp effect which you will not be able to alter in performance. There is, of course, nothing to stop you modelling just about any (non modulated) sound you can create with your physical gear.
The $64k question is should you buy this software? I think the answer has to be that if you are happy with Amplitube 5 and don't want to capture any additional tones you probably should not. Amplitube 5 is extremely versatile and customisable and will probably be all you need. But . . capturing and then being able to replicate your own tones anywhere is simply brilliant and once you have started you won't want to stop.
System Requirements
TONEX for Mac/PC
TONEX for Mac/PC is a 64-bit application and requires a 64 bit CPU and Operating System.
Mac®
Intel: Intel® Core™ i3 (Core i5 recommended for Modeler), macOS® 10.11 (macOS® 11 Big Sur required for Modeler), 4 GB of RAM, 6 GB of hard drive space
Apple Silicon: Apple M1, macOS® 11, 4 GB of RAM, 6 GB of hard drive space. TONEX is a native Apple Silicon application.
Supported Plug-in formats : Audio Units, VST 2, VST 3, AAX.
Windows®
Intel: Intel® Core™ i3 or equivalent CPU (Core i5 recommended for Modeler), Windows® 10, 4 GB of RAM, 6 GB of hard drive space, NVIDIA GPU with Maxwell or newer architecture is recommended to reduce training times (eg. GeForce GT 750 or higher).
Supported Plug-in formats (64-bit): VST 2, VST 3, AAX.
Internet connection is required to authorise the application and access ToneNET.
Views: 11033
AMPLITUBE 5 REVIEW (INCLUDING MAX COLLECTION)
New from IK Multimedia is version 5 of their popular AmpliTube application, stand alone and VST/AAX plugins.
An in-depth look at IK Multimedia's AmpliTube 5 software. Tested reviewed by Howard Worf, for us here at Guitarist Guild.
I stress that the opinions following are mine alone and based upon my personal experiences in a home studio and running the PA in my basement. CONCLUSION:
The more I use it the more I like AmpliTube 5. The MAX version is absolutely awesome.
If you want to have a whole universe of sounds at your whim, think about getting an iRig Stomp controller, AmpliTube 5 MAX (or AmpliTube 5 which can be bundled with a iRig controller - €349.99 plus tax and save money), your laptop and a full range combo like a Harley Benton* G212AFR - €285 including VAmplitube . Realistically for what you would pay for a decent 100w mono combo you can have it all. Quite tempting?
For Reaper (which has no amp simulation built in) and Studio One (where the built in simulations are very limited) AmpliTube 5 it is an obvious top of the range add-on for recording. In Cubase the decision is a little less clear cut, but if you want stunning accuracy in your emulations and extremely fine and sophisticated control over your sounds the it is the thing to go for.
I do not think MAX is for everyone. The SE or 5 versions seem to me to be the ones that would be the optimal choice for most users. Any additional gear models you fancy can be tried before buying in the new version of Custom Shop. Better value unless you simply must have everything.
MAX PACKAGE BREAKDOWN:
107 amplifier models, 107 stomp models, 101 speaker cabinet models, 331 speaker driver models, 18 different microphone models, 44 rack effects, 8 different room layouts. And 600 impulse response models.
INITIAL THOUGHTS AND TEETHING TROUBLES:
I suspect this had been released to meet a deadline before it was entirely ready. There are reports of incompatibility issues, particularly with laptops where it seems many users can't get it to start.*
I have not had that issue with my laptop installation, perhaps because my laptop has a 1080p display. I have, however, had other issues.
• The download size is 2.4gb – this is everything available within AmpliTube 5, so even if you just want to try the free to AmpliTube 4 owners 'Custom Shop' version you have to download the whole lot (MAX)
• The Product Manager repeatedly crashed on my desktop, and stopped frequently during downloads on my laptop – requiring manual restarts
• Cubase 10.5 didn't recognise the VST3 plugin at all. Cubase is my main DAW.**
• Quite large variations in the apparent volumes of the presets
• Slow to load on both my older desktop PC and new Ryzen 7 laptop, although the latter is obviously noticeably faster than the desktop
• There have been complaints that previously purchased gear from AmpliTube 4 is not available in Amplitube 5. I had this issue, only to find that my Engl Powerball, in AmpliTube 4 called 'Engl Powerball' is labelled 'Powerball' in AmpliTube 5, so searching for Engl, which is what I did, produces no results. I had almost completed my support request when I found it by accident.
• Can be resized within a DAW. Click and drag the small triangle symbol on the bottom right hand corner – very useful
• T-Rack derived studio effects added - excellent
*Fixed in release 5.0.1 for laptops with 1400 px screens. Now opens beyond full screen size on my 1080p laptop.
**Fixed in release 5.0.1 – Cubase Pro 11 now running the VST3
WHAT HAVE WE GOT?
4 versions:
• Custom Shop – free – 39 models
• SE - €149.99 plus VAT – 77 models
• 5 - €199.99 plus VAT – 177 models
• MAX - €399.99 plus VAT - more than 400 models including with 11 artist signature packs – the version provided for this review and the best bang for your buck if you simply must have everything
• Various packs with AmpliTube 5 and bundled hardware
• At the time of writing there are substantial launch discounts available – check IK Multimedia's site for details.
A completely redesigned interface, both stand alone and as a plugin – a more modern look
Drag and drop gear and edit signal paths
4 different signal path designs
New mixer section – which I think is a really worthwhile addition
Much improved looper (stand alone implementation)
Transfer of models purchased in AmpliTube 3/4 to AmpliTube 5
Studio effects units based upon T-Racks – really very good indeed
It could be my old ears, but the modelling sounds smoother and more accurate, especially the effects.
LET'S GET STARTED – STAND ALONE IMPLEMENTATION
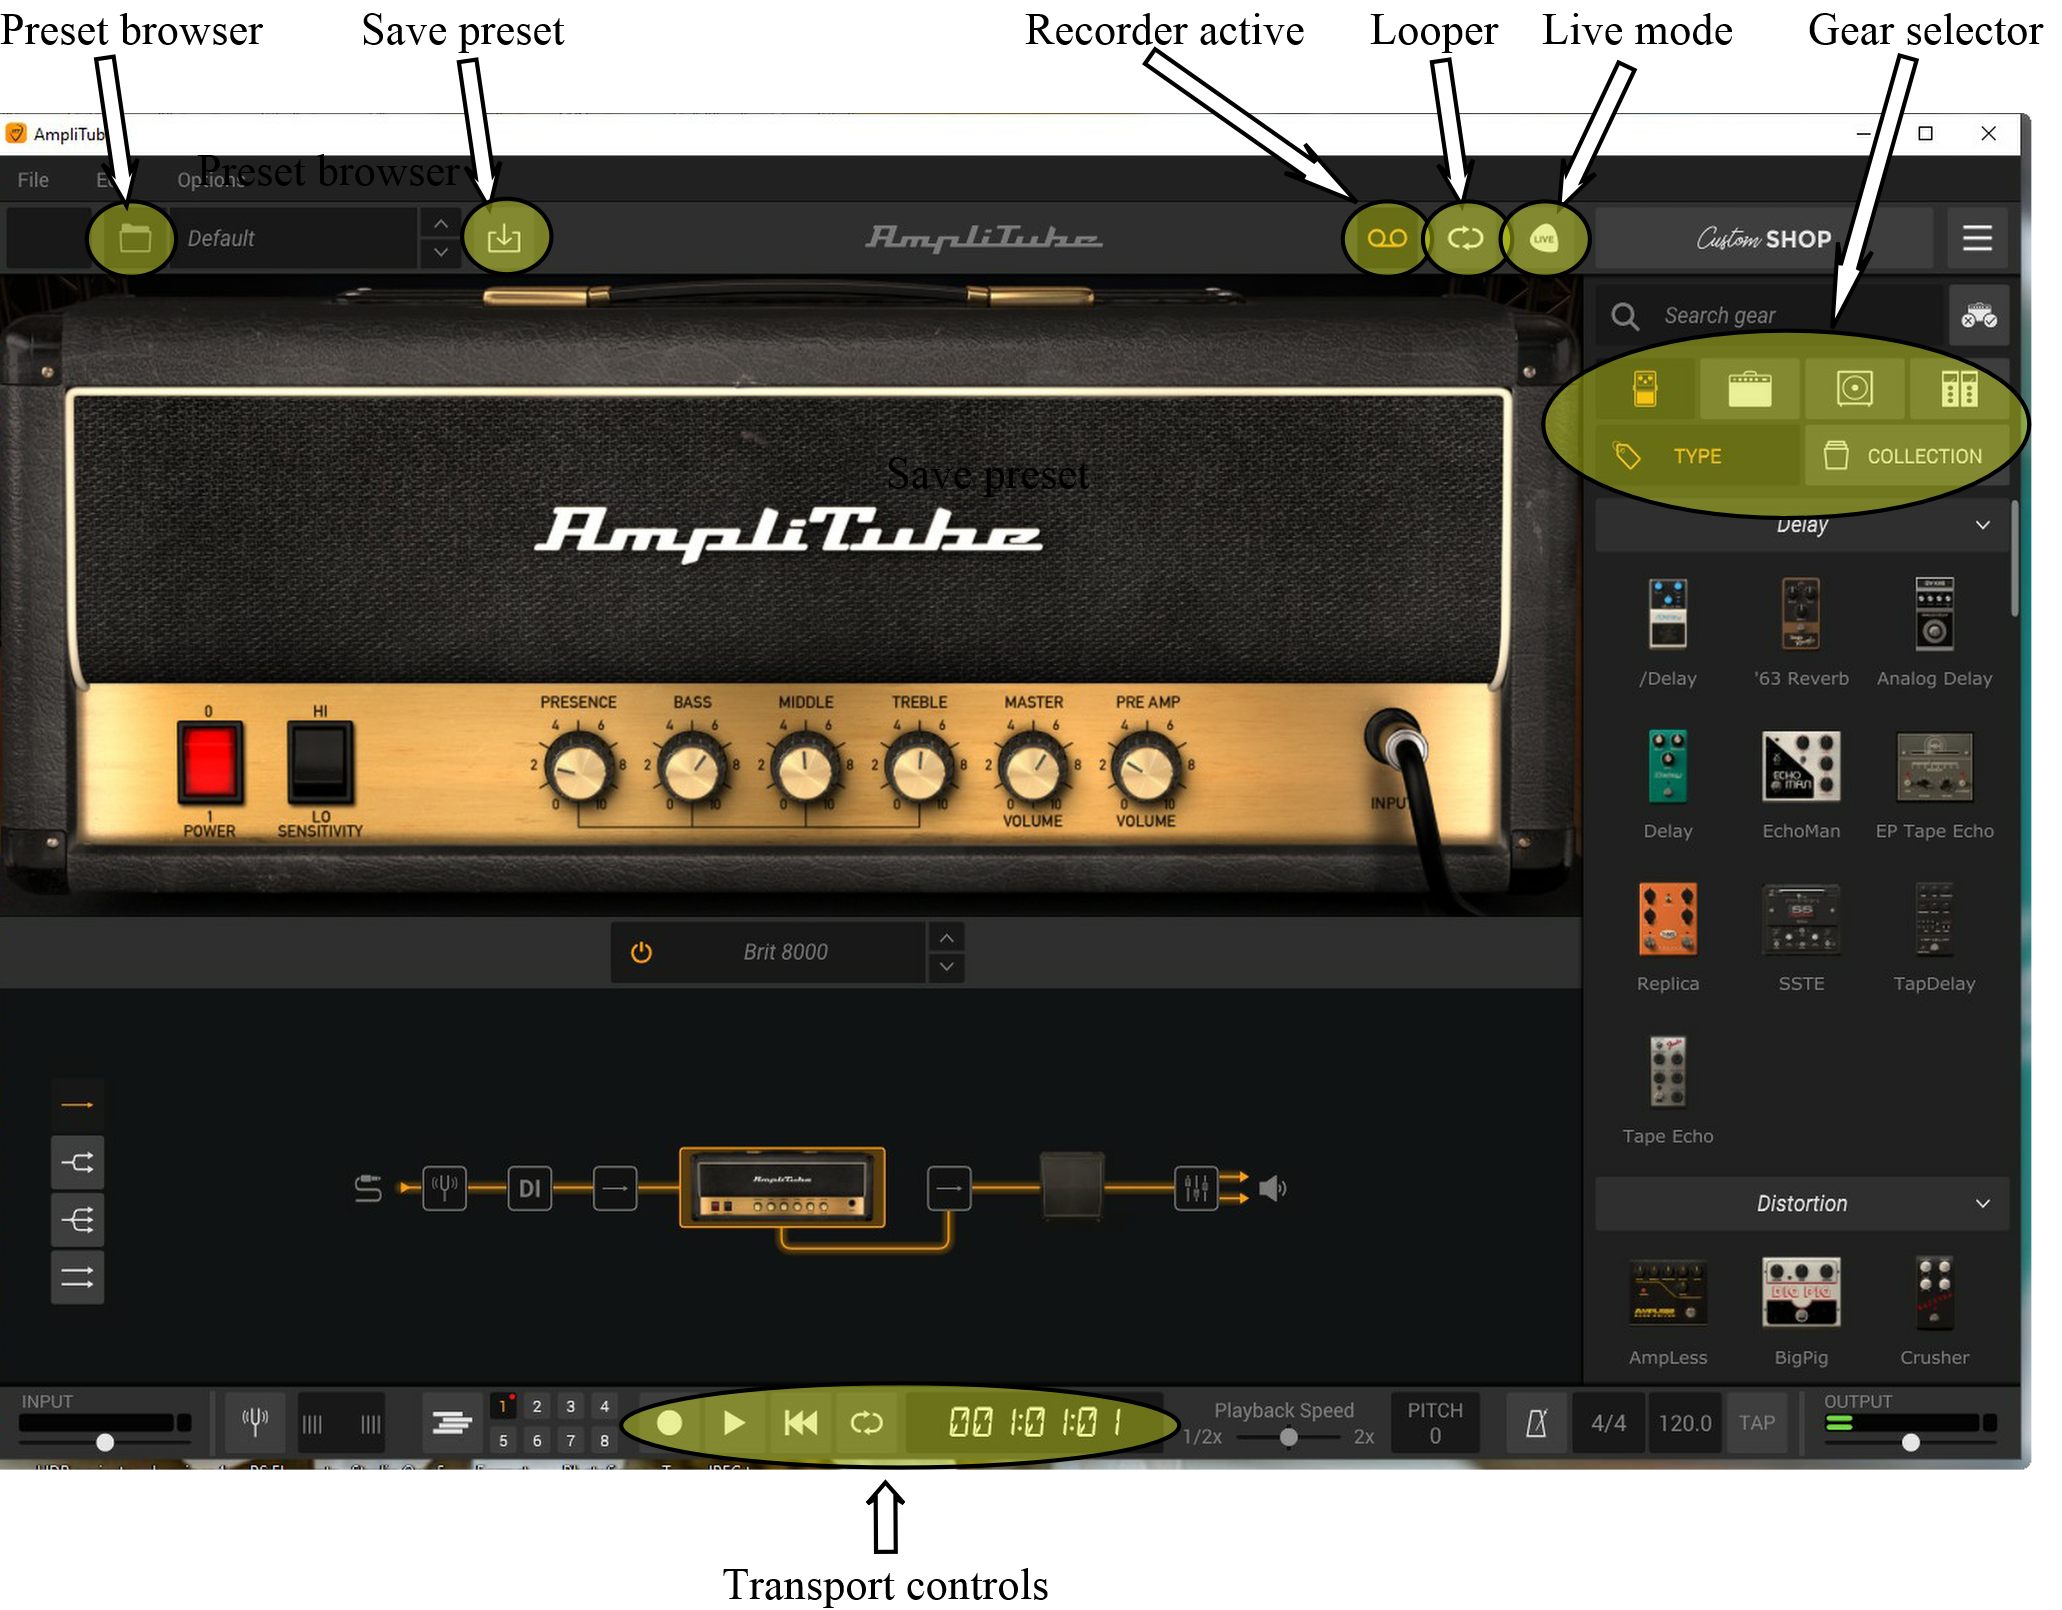
Opening up give us the default screen

Opens with a default British 8000 amplifier model. No effects, just a matched cabinet. Which sounds great, by the way.

With a more powerful and modern processor lower buffer sizes will be possible, but the latency at 256 is not causing me any issues.
Going to the gear selection menu, the first icon is for stomps, the second for amplifiers, the third for the speaker cabinet, the last for post effects.


Please note the main mixer icon is in the signal path.
Self explanatory and a very useful addition.
Self explanatory and a very useful addition.
Let's have a look at the modules:
The Recorder:
IK says this is an 8 track DAW. This, in my opinion is rather stretching the truth. It does have 8 tracks, some basic EQ and cut/paste/loop/playback speed functions. There is no VST support, so you cannot add a drum VST. To get a drum track you have to have an audio file you can import.* It is also possible to import a music track to jam along to.
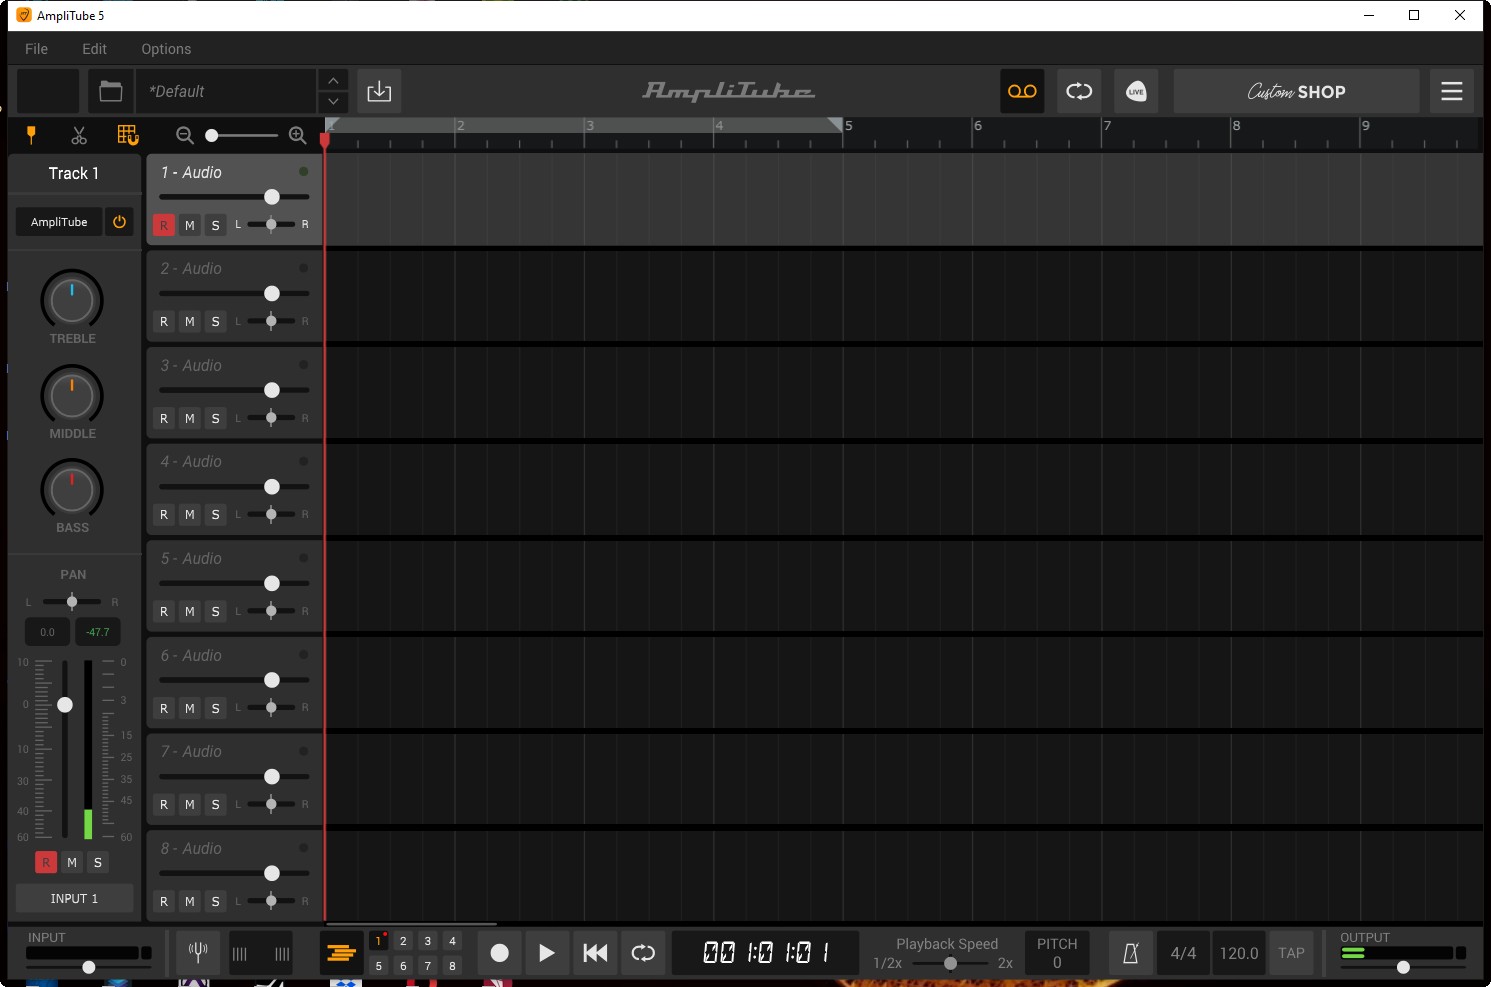
My advice is to get a free DAW if you want to do any recording, there are many to choose from including Studio One Prime (the one I would choose), Audacity, LMMS. If you have an audio interface the likelihood is that a free DAW came with it, so use that instead.
*Unless I have completely misread the manual – but I could not see any way to have anything but audio tracks.
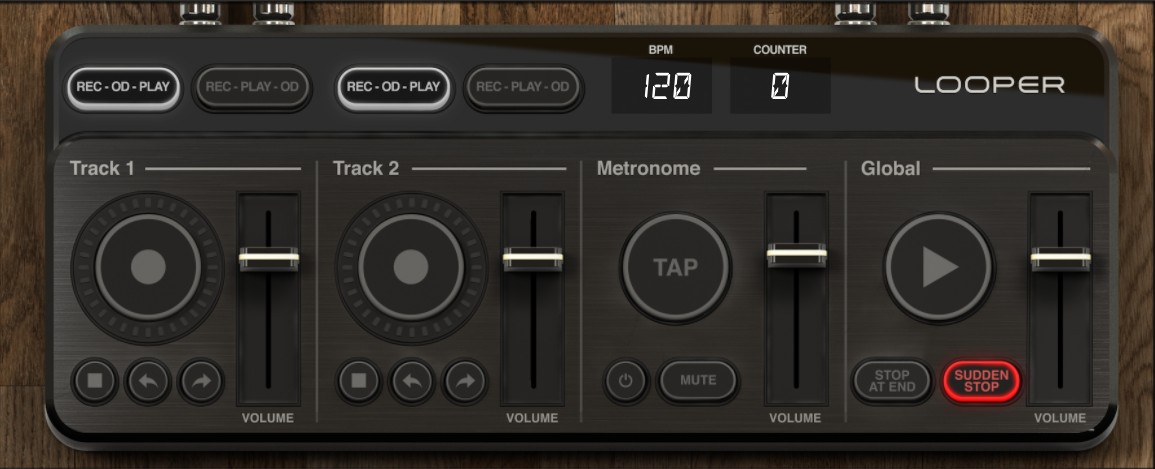
The Looper: This looks like it could be a lot of fun, but realistically requires a MIDI floor controller, something I do not possess, so I cannot comment any further.
Live: Store your favourite presets for instant recall during live performance or rehearsal. Again requires a MIDI floor controller, so no further comment.

Before we move on, I'm sure by now you will have noticed how dark and, well, gloomy, the new UI can appear at times. As I mentioned in the preface there have been comments criticising the dark hues of the UI and in particular the difficulty of actually seeing some on the sub menu items. I know that there have been requests for a lighter theme as an option, and I am sure that would be most helpful for a lot of users.
GUITAR:
The sheer number of pieces of gear available in the MAX version! As well as four different signal path templates that allow you to place almost everything in any place or combination you desire, there are far too many stomps, amps, cabs, and studio effects to mention individually. More than 400 all together, and when you add in the speaker driver, microphone, and room mixing choices the better part of your life could be taken up with refining your patches.
So I am not even going to try to list them all. Suffice it to state that every eventuality I can imagine is covered.
What I have done I go through many of the preset patches - all of the AmpliTube 5 and AmpliTube 5 CS ones.
As you can guess there are some outstanding tones in there, to use as they are are, or more likely to use as a starting point for your own tweaks.
I did notice that using some of the high gain presets with coils split or single coil were spectacularly noisy*– a few presets have a signal to noise ratio of approaching zero – seriously the amp noise is louder than the guitar signal. In these cases the Epiphone performed the best with coils split (although I understand that technically the Epiphone coil splitting isn't using one coil completely separated from the opposite winding), followed by the Schecter and the Harley Benton Fusion which were each drowned out by the amp noise in single coil configuration.
*They're not needed, there is plenty of capacity for very high gain amplification without using these.
I have been able to make some comparisons with Positive Grid's Bias FX2 and also, of course, with Cubase's VST Amp rack and Studio One's Ampire. It's very obvious that AmpliTube 5 is more sophisticated than any of these, in particular the Studio One offering. These other three do, of course, have some good useable tones in their presets.
Bias FX2 - while Bias FX is another quite expensive plugin/standalone emulator it is roughly half the price for an equivalent AmpliTube 5 package (even less when on frequent sale) although the expansion packs seem to me to be a little pricey as well as not really necessary. It is nowhere near as complex or flexible as AmpliTube 5 though, for instance having only two potential signal paths, a more pedestrian UI that can only be resized to 125% or 175% of default, and four cab microphones to choose from among many other specification shortfalls. I do not think that there is a huge difference in practical terms to how good either of them sound, each have their strengths and weaknesses but overall I would say AmpliTube 5 sounds somehow smoother. As a plugin BIAS is always outputting a lower volume than it's peers unless the microphones are adjusted, and the amplifier gain and master controls seem a bit on/off at times. AmpliTube 5 is streets ahead in terms of sophistication and tweakability; there is a lot more to play with and it is far more attractively packaged.
VST Amp Rack – I mention this only because I do have Cubase Pro 11. Only comes with Cubase and can only be used in that DAW, so not portable and no use at all if you haven't got either Artist or Pro Cubase and they are quite expensive. The next to least sophisticated of the emulators, but it nevertheless sounds good, and because it is simpler it is less demanding to customise if limited compared to AmpliTube 5. Very useful if you have no other amplifier modelling, has some very useful presets and the bass amp emulations are IMO excellent. Good enough in the absence of anything more realistic and flexible.
Ampire in Studio One. Only OK if you have nothing else. The base version of AmpliTube 5 is infinitely better.
BASS GUITAR:
As you would expect far fewer amplifier models for bass guitar, 15 in AmpliTube 5 MAX. 8 of these, however, are various Ampeg simulations. Only one of them is a simulation of a make of head I actually use – Trace Elliot. Unsurprisingly neither my my Ampeg Portaflex 500 or Laney R500H are included. It is a pity there are no offerings from Markbass, Eden, Darkglass or Ashdown.
AmpliTube 5 (as did AmpliTube 4) knocks Studio One's Ampire out of the park – there is simply no comparison. I'm more ambivalent about the comparison with Cubase's VST Bass simulator. The latter is nowhere near as sophisticated, like the guitar offering, having only 7 bass head models (including Eden) as opposed to the 15 available in AmpliTube 5 MAX. There is a 'but' for me though. I still have 2 Trace Elliot heads; although the Amplitube 5 Trace simulation has the highs it is a little lacking in the low end with the RB414 passive bass to my ears without fiddling with it – not a fault the Cubase emulation has. With the active basses I would say AmpliTube 5 is perfect.
Although here we have the classic conundrum – AmpliTube 5 is so sophisticated that you can for all intents and purposes get whatever sound you want. Don't forget, as mentioned in the guitar section, there is fully featured room and microphone mixing panel enabling almost unimaginable variation. So if you are the kind of person who will tweak a sound until it is just so, there is no arguing with the fact that Amplitube 5 is a dream come true. This, is, of course, especially useful for live performance.
My favourite amongst the bass emulations is the Gallien and Krueger MB150S, although the in house AmpliTube branded bass amps sound very good IMO. Some of the presets using the AmpliTube 5 basis solid state preamp are very satisfying. As a bass player, if I were going from the CS or free version of AmpliTube 5 I would purchase that Gallien Kreuger to go with it if I was looking for a larger variety of tones.
To conclude this section: as with the guitar emulations the bass amps just sound better than they did in AmpliTube 4, although, of course, that remains a perfectly good application.
I have no hesitation is recommending AmpliTube 5 in one variant or another for bass players or recording bass guitars no matter which of the DAWs I have tested it with you might have.
Be in no doubt though, the bass guitarist is nowhere near as well served by AmpliTube 5 as the common or garden electric guitarist.

CONCLUSION:
The more I use it the more I like AmpliTube 5. The MAX version is absolutely awesome.
If you want to have a whole universe of sounds at your whim, think about getting an iRig Stomp controller, AmpliTube 5 MAX (or AmpliTube 5 which can be bundled with a iRig controller - €349.99 plus tax and save money), your laptop and a full range combo like a Harley Benton* G212AFR - €285 including VAmplitube . Realistically for what you would pay for a decent 100w mono combo you can have it all. Quite tempting?
For Reaper (which has no amp simulation built in) and Studio One (where the built in simulations are very limited) AmpliTube 5 it is an obvious top of the range add-on for recording. In Cubase the decision is a little less clear cut, but if you want stunning accuracy in your emulations and extremely fine and sophisticated control over your sounds the it is the thing to go for.
I do not think MAX is for everyone. The SE or 5 versions seem to me to be the ones that would be the optimal choice for most users. Any additional gear models you fancy can be tried before buying in the new version of Custom Shop. Better value unless you simply must have everything.
Things used in this review:
PCs: 8 year old desktop AMD FX8, 16gb ram, laptop ASUS VivoBook 15, 6gb ram
DAWs – Cubase Pro 11, Studio One 5 Professional, and Reaper 5.99
Monitoring – Behringer Truth B2031A near field, AKG K240 headphones
ASIO Interfaces – Steinberg UR22, Behringer UMC404HD
MIDI controllers – Akai MPC Element, Novation Impulse 61
OS – Windows 10 Home
Guitars - Epiphone Prophecy GX, Schecter Banshee Diamond Extreme, Harley Benton* Fusion Pro ll HH, Ibanez SG300EB, Harley Benton* RB414, and Marcus Miller M7 V2
PA – Mixer (run flat) Behringer Xenyx X2442, amp Behringer KM750, and the Box PA302s*.
*Yes, I do get a lot of stuff from Thomann, what can I tell you?
System Requirements
AmpliTube is a 64-bit application and requires a 64 bit CPU and Operating System.
Mac® (64-bits)
Minimal: Intel® Core™ 2 Duo (Intel Core i5 suggested), 4 GB of RAM (8 GB suggested), macOS 10.10 or later. 3 GB of hard drive space.
Requires an OpenGL 2 compatible graphics adapter.
Supported Plug-in formats (64-bit): Audio Units, VST 2, VST 3, AAX.
Windows® (64-bits)
Minimal: Intel® Core™ 2 Duo or AMD Athlon™ 64 X2 (Intel Core i5 suggested), 4 GB of RAM (8 GB suggested). Windows® 7 or later. 3 GB of hard drive space.
Requires an ASIO compatible sound card.
Requires an OpenGL 2 compatible graphics adapter.
Supported Plug-in formats (64-bit): VST 2, VST 3, AAX.
Internet connection is required as all of the Custom Shop operations are web based.
Views: 6909
AmpliTube Joe Satriani®
From IK Multimedia, a new Amplitube® 4 collection – Joe Satirani
"A Time Machine of Tone."
From IK Multimedia, a new Amplitube® 4 collection – Joe Satirani. "A Time Machine of Tone." Tested reviewed by Howard Worf, for us here at Guitarist Guild.
I stress that the opinions following are mine alone and based upon my personal experiences in a home studio set up. Testing has been done exclusively within either the stand alone PC version or through a DAW as a plugin. All brand names are the copyright property of the brand owners.
Conclusion: and absolutely excellent suite of classic rock presets with three brilliant amplifier emulations, classic stomps and a variety of cabs to play with. If you loved the 80s/90s rock sounds then this is definitely for you.
The collection comprises a suite of gear:
Amplifiers:
Satch VM - customised Marshall® 4 channel
SJ50 - customised Peavey® 5150®
Boston 100 - model of Tom Scholz X100
Cabs:
Satch Green - 69 Marshall® with 4x12 20w Greenback Celestions®
Satch 60 - 60 Marshall® with 4x12 GT12T-75 Celestions®
Boston Sym - Model of the cabinet simulation from the Boston 100
Stomps:
Satch Wah - Vox® Big Bad Wah
Satch Distortion - Boss® DS-1
Satch Overdrive - Boss® OD-1*
Tube Overdrive - Model of JS's modified Chandler® OD with 12AX7 valve
Satch Octave - Model of Ultimate Octave pedal
. . . and dozens of presets based on these, 20 in the discography section and 29 in the general
section.
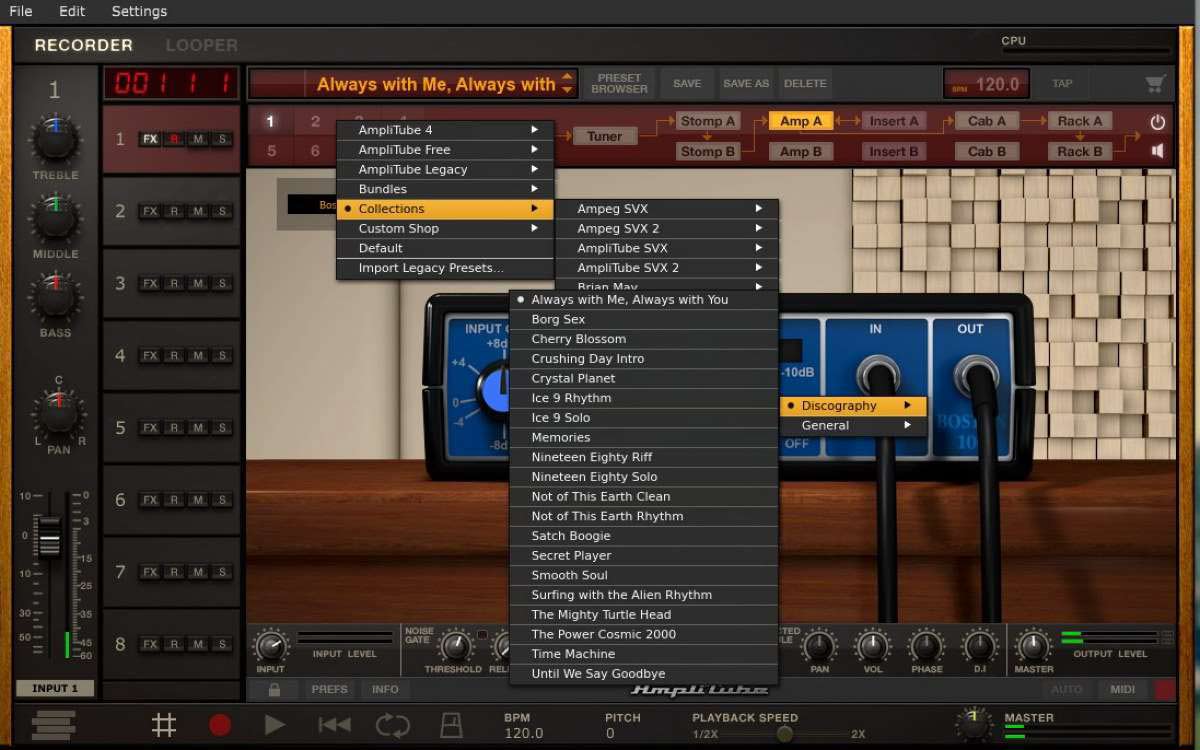
Here is a shot (from stand alone interface) of the list of general presets:
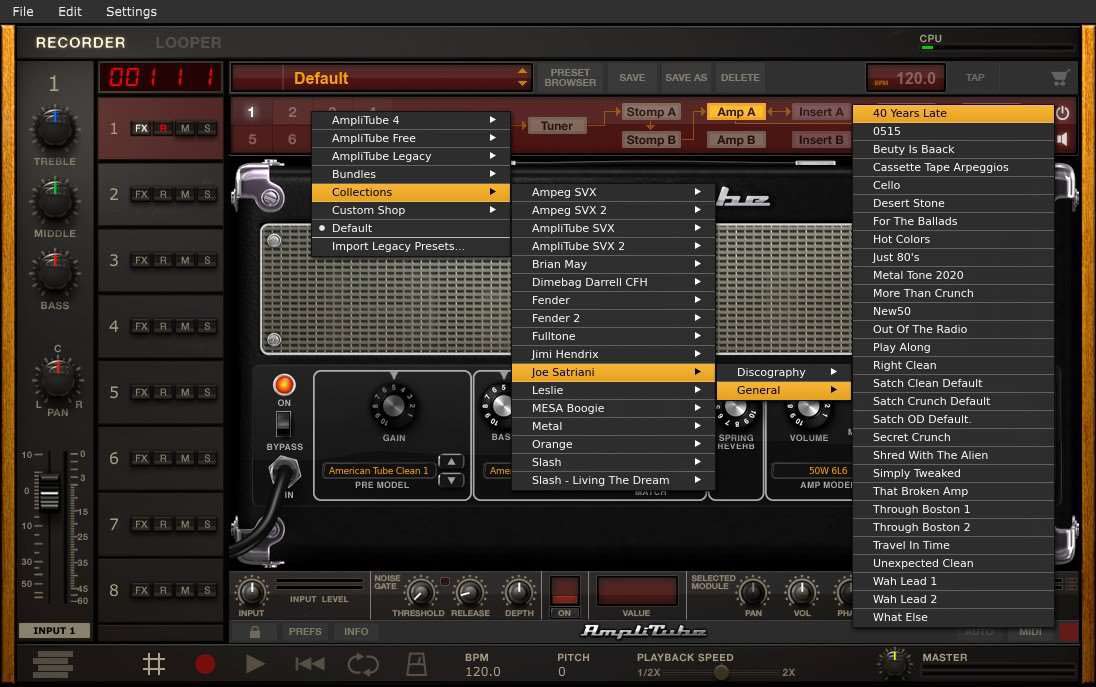
Here is a shot (from stand alone interface) of the list of discography presets:
I feel I need to mention is sample rates. The minimum for the stand alone app is 256 samples and I could not get either of my USB interfaces to work without breaking up at anything less than 512 samples, and even that was not particularly stable. Luckily within a DAW (I've tested with Cubase Pro 10.5 and Studio One 4.5) the lower sample rate of 256 works without issue, but, of course those of you who do not have an 8 year old PC, or have a lightning or firewire interface might find that higher sample rate latency is not an issue in the stand alone version. Unfortunately my firewire interface has shuffled off this mortal coil.
Rather than add a lot of images to this review, please visit IK Multimedia for their gallery of gear pictures:
https://www.ikmultimedia.com/products/satriani/index.php?p=images
It's an automatic slide show that will take you through everything that is available in the collection.
As my main live rock band playing times were the late 80s and 90s, albeit as a bass guitarist, you would expect me to be very happy with the suite of sounds offered as presets, and perhaps even more so by the inclusion of two hot amps and one legendary one. And you would be correct. The presets are (for the most part) fat and sonically full, thick even, with a marked emphasis on multiple delays – just the way I like it. Perfect for melody and solos as well as punching rhythms. The clean sounds are equally impressive. My current absolute favourite preset is Smooth Soul from the discography collection. Lovely sound, especially with the Schecter.
Playing just with the amps has been the highlight of this review process for me, especially the hot Marshall® and 5150®. Quite literally hours of fun.
A few additional and very important things to mention. The collection comes wrapped in the latest
version of Amplitube®. This gives the user some rather splendid features in the stand alone version.
These include:
• Perfect integration with IK's range of audio interfaces and floor controllers allows for
instant recording and performing in the studio or on stage with full programming**
• 2 track recorder
• Import of audio files
• SpeedTrainer - speed up or slow down imported tracks without affecting the pitch – the perfect tool for practicing or learning your favorite riffs and solos.
And in the DAW version there is automation and BPM synchronisation.
I have not been able to ascertain what is packaged with the Amplitube® 4 wrapper as I am a long time owner of an Amplitube® 4 licence, but I can imagine that you would need at least the Amplitube® Custom Shop installed – this is free – otherwise the price of the collection at €99.99 (+ sales tax or VAT wherever you are) would undercut Amplitube® 4 at €149.99 (+ sales tax or VAT wherever you are).
Conclusion: and absolutely excellent suite of classic rock presets with three brilliant amplifier emulations, classic stomps and a variety of cabs to play with. If you loved the 80s/90s rock sounds then this is definitely for you.
Things used in this review:
Guitars – Schecter Diamond Extreme, Harley Benton Fusion Pro ll HH. Well, it would have been rude to test without Floyd Rose® equipped guitars!"
DAWs – Studio One 4.5 Pro, Cubase 10.5 Pro
Monitoring – Behringer Truth B2031A near field, AKG K240 headphones
ASIO Interface – Behringer UMC404HD, Steinberg UR22
MIDI controllers – None
OS – Windows 10 Home
* I used to own one of these 'legendary' pedals. Mine never sounded as good as this emulation.
** Alas, I do not have access to any of these wondrous devices.
https://www.ikmultimedia.com/products/satriani/
System Requirements
AmpliTube is a 64-bit application and requires a 64 bit CPU and Operating System.
Mac® (64-bits)
Minimal: Intel® Core™ 2 Duo, 2 GB of RAM (4 GB suggested), macOS 10.7 or later.
Supported Plug-in formats (64-bit): Audio Units, VST 2, VST 3, AAX.
Windows® (64-bits)
Minimal: Intel® Core™ 2 Duo or AMD Athlon™ 64 X2, 2GB of RAM (4 GB suggested), Windows® 7, Windows® 8 or Windows® 10. Requires an ASIO compatible sound card.
Supported Plug-in formats (64-bit): VST 2, VST 3, AAX.
Views: 14722
AMPLITUBE BRIAN MAY COLLECTION REVIEW
From IK Multimedia, a new Amplitube 4 collection – Brian May.
"Tone That Will Rock You."
Amplitube 4 collection – Brian May Tested reviewed by Howard Worf, for us here at Guitarist Guild.
I stress that the opinions following are mine alone and based upon my personal experiences in a home studio set up. Testing has been done exclusively within either the stand alone PC version or through a DAW as a plugin. All brand names are the copyright property of the brand owners.
The collection comprises a suite of gear:
Amps and Cabs:
BM 30 which emulates the classic three Vox AC30 setup
BM DK emulation of a custom amplifier made by John Deacon
2x12 BM 30 Blue – emulation of Vox AC 30 cab with 2 Celestion Alnico Blue drivers
2x12 BM 30 H70 – emulation of Vox AC 30 cab with 2 Celestion G12H drivers
1x6 BM DK – emulation of 1x6 custom John Deacon cab

Guitar:
Red Special – emulation of the famous 3 pickup handmade guitar
Pedals:
Star Gate – emulation of a generic classic noise gate
Treble Booster – emulation of KAT Treble Booster
May Wah – emulation of rack mount Dunlop Cry Baby
Fox Phaser – emulation of the fOXX Floor Phaser

Presets:
It doesn't seem like a lot but together (and in conjunction with other effects already built in to Amplitube 4 – rack graphic EQ, delay, reverbs etc) you get a very diverse and pleasing set of sounds. These are available through the collections presets menu, Brian May. The presets are representative of decades of famous Queen and Brian May recordings.

And, of course you get the gear to play with as you like in conjunction with either basic Amplitube sets or any other gear or collections you have purchased.
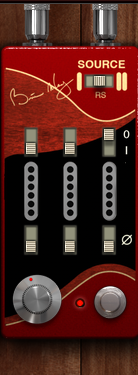
It would be tempting to think that the sounds could be relatively easily duplicated with one of the many VST amp racks out there, but it's not. The reason for this is that many of the sounds use an emulation of the three AC30 set up May is famous for (2 of the three swept left/right with selectable built in chorus, delay, or harmoniser, the third clean and centred). Then there is the Red Special itself with the Burns Tri-Sonic pickups connected in serial (not parallel like most guitars) and with each pickup having a phase selector. This latter is as important to the dynamics of the sound set as the three amp rig. It is very important to set the source selector to the correct choice for the guitar you are using, single coil (such as a standard Stratocaster), Red Special (if you have one) or humbucker (such as a Les Paul). If using a hybrid guitar, such as my Schecter, make sure you are either using the humbucker or single coils (or split humbucker). The default is the middle position which seems odd as Red Specials are not the most common guitars out there. Although as the Red Special is an entirely single coil loaded guitar there is not a huge amount of difference between the settings I and RS.
The whole package has been very carefully designed to help the user replicate Brian May's tones from the 70s onwards – the treble booster for example is switchable through the decades.
Be sure to download and read the AmpliTube Custom Shop Gear Models.pdf from the My Products section of the IK Multimedia website – detailed and clear instructions on how to use the gear and amplifiers in this collection.
CONCLUSION:
I am a great fan of IK Multimedia – I have had and used Amplitube since version 3*, and Amplitube 4 is my go to guitar rig modeller. This is very accomplished suite of custom gear and amplifiers with a quite unique and special set of sounds. I particularly like the 3 AC30 chain, sounds excellent even on its own. There are dozens of presets in the collection, all of them interesting and authentic. To my ears it sounds better if used with a guitar with single coils – in my tests the Squier Stratocaster with Wilkinson Hot single coils and custom wiring sounded the best. A close second was the Harley Benton Victory (which with alnico humbuckers just sounds really good all of the time). That is, however, just my personal opinion, it sounded good with all the guitars I used, and, of course, everything is adjustable. A couple of quibbles. The Amplitube window itself is not scaleable which means that some of the parameter adjustments, in the harmoniser settings of the AC30 amps for example, are tiny, and the CPU load seems to be quite high even with no audio input. I would like to see the AC30 amp combination and cabs available as separate purchases from the Custom Shop, as I not sure that the pedals add a great deal of individuality in themselves. The collection does seem a little expensive – the Slash collection by comparison is €59.99.
Things used in this review:
Guitars – Schecter Diamond Extreme, Epiphone Prophecy Plus GX, Harley Benton Fusion Pro ll HH, Harley Benton Victory Plus Vintage, Fender Squire Stratocaster Affinity with custom wiring and hot single coils.
DAWs – Studio One 4.5 Pro, Cubase 10 Pro
Monitoring – Behringer Truth B2031A near field, AKG K240 headphones
ASIO Interface – Behringer UMC404HD
MIDI controllers – None
OS – Windows 10 Home
System Requirements
AmpliTube is a 64-bit application and requires a 64 bit CPU and Operating System.
Mac® (64-bits)
Minimal: Intel® Core™ 2 Duo, 2 GB of RAM (4 GB suggested), macOS 10.7 or later.
Supported Plug-in formats (64-bit): Audio Units, VST 2, VST 3, AAX.
Windows® (64-bits)
Minimal: Intel® Core™ 2 Duo or AMD Athlon™ 64 X2, 2GB of RAM (4 GB suggested),
Windows® 7, Windows® 8 or Windows® 10. Requires an ASIO compatible sound card.
Supported Plug-in formats (64-bit): VST 2, VST 3, AAX.
Amplitube 4 collection – Brian May
All Amplitube For PC and Mac